React + Spring Boot + MongoDB CRUD示例
在本教程中,我们将学习如何使用React作为前端和Spring boot作为后端建立一个CRUD全栈应用程序。我们将使用MongoDB作为NoSQL数据库。
什么是React JS?
- React是用来在前端建立用户界面(UI)的。
- React不是一个框架(不像Angular,它更有主见)。
- React是一个由Facebook创建的开源项目。
什么是Spring Boot?
Spring Boot是一个有主见的框架,可以帮助开发者快速、轻松地构建基于Spring的应用程序。 **Spring Boot的主要目标是快速创建基于Spring的应用程序,而不要求开发人员反复编写相同的模板配置。
什么是MongoDB?
MongoDB是一个文档数据库,具有你想要的可扩展性和灵活性,并具有你需要的查询和索引功能。
我们将建立什么?
我们将建立一个基本的**员工管理应用程序,**** **CRUD功能。
- 创建雇员
- 列出雇员
- 更新雇员
- 删除雇员
- 查看雇员
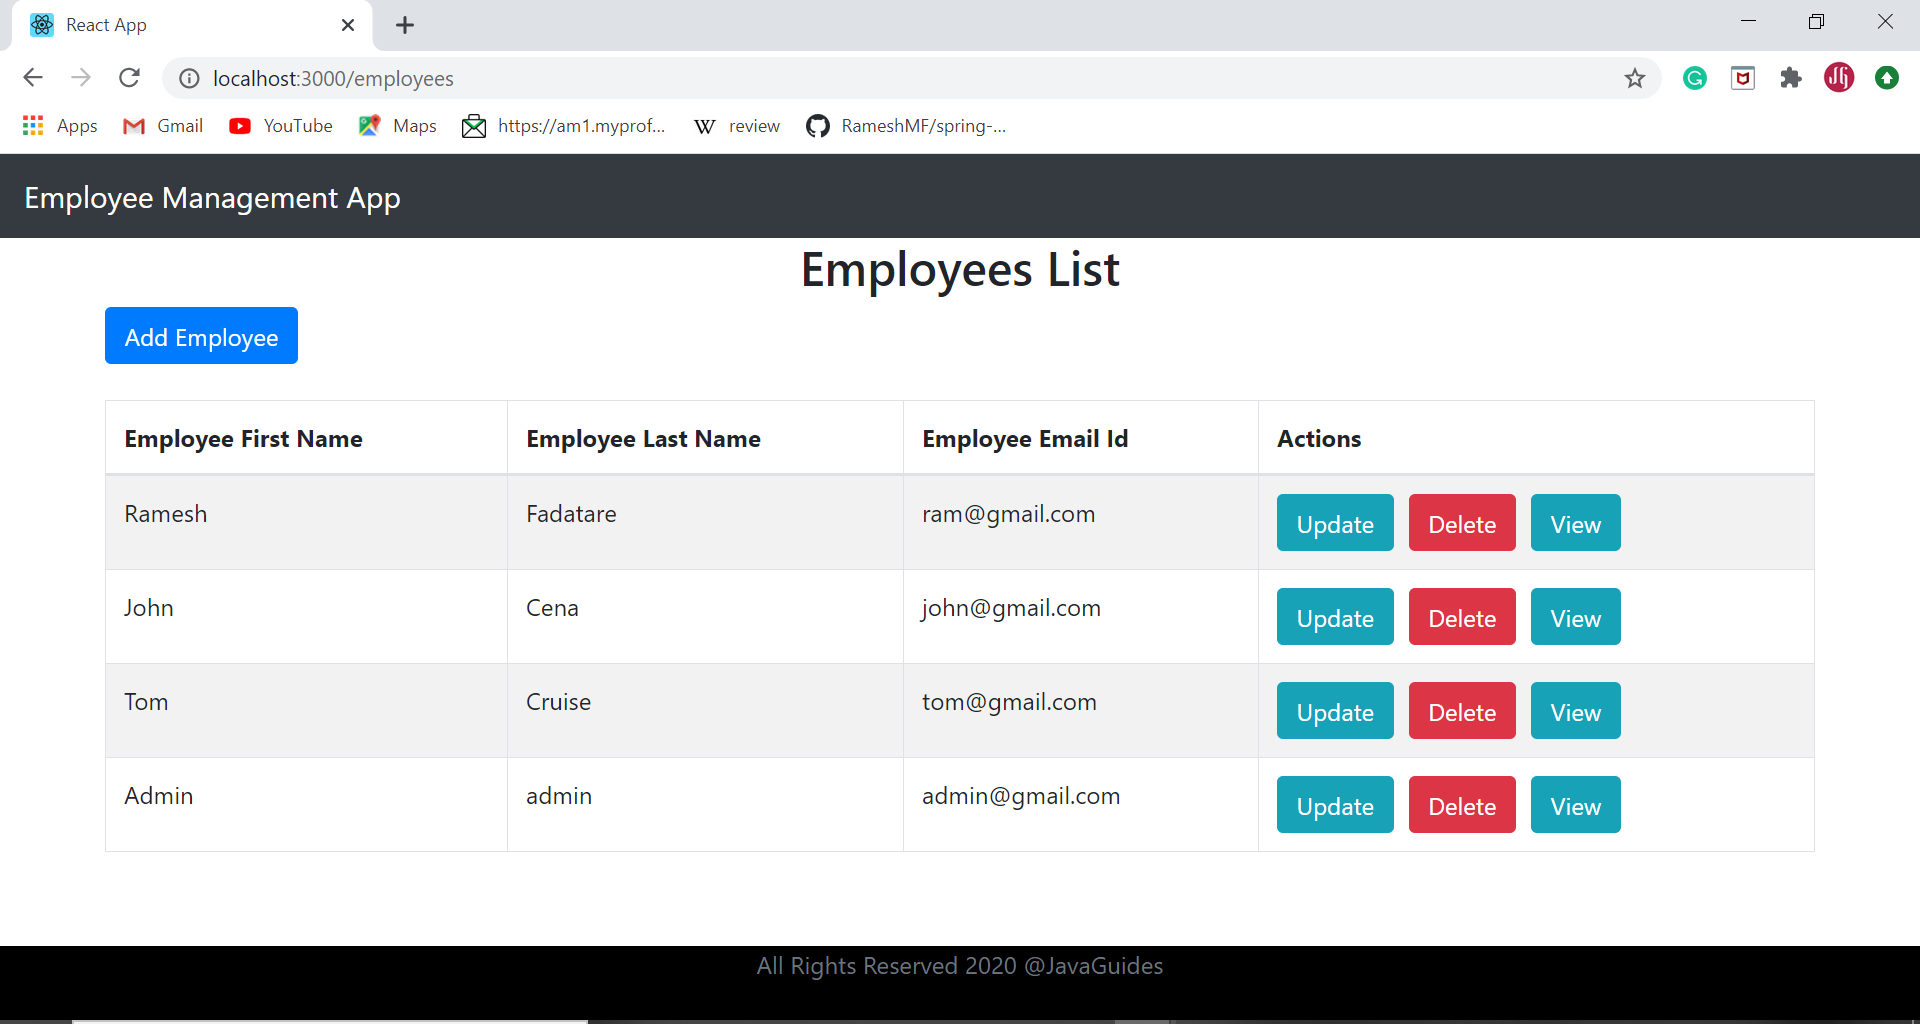
以下是我们的应用程序的最终版本的截图 -
##先决条件
关于使用Spring Boot和MongoDB数据库构建CRUD REST API,有一个单独的教程--Spring Boot + MongoDB CRUD实例教程。
在本教程中,我们将构建CRUD React应用程序,以消费Spring Boot + MongoDB CRUD示例教程中暴露的REST API。
因此,在构建React应用程序之前,请确保你的Spring Boot应用程序已经启动并运行,所有五个REST API都在工作。

构建React JS CRUD应用
让我们继续创建一个React应用程序来消费CRUD REST APIs。
我建议你在ReactJS + Spring Boot CRUD Full Stack Application观看一个YouTube视频教程系列,以了解更多关于这个全栈应用程序的信息。
我们知道,React是一个基于JavaScript的库,不具备进行HTTP请求的能力;因此,我们需要使用第三方库来实现。
有很多库可以在React应用中进行HTTP调用。下面列出了其中的几个。
- Axios
- Fetch
- 超级代理
- React-axios
- Use-http
- React-request
在本例教程中,我们将使用Axios HTTP库来进行REST API调用。
让我们开始使用**create-react-app CLI创建一个React App。
###1 - 使用Create React App创建React UI
Create React App** CLI工具是官方支持的创建单页React应用程序的方式。它提供了一个现代化的构建设置,无需配置。
要创建一个新的应用程序,你可以选择以下方法之一。
使用npx
npx create-react-app react-frontend使用npm
npm init react-app react-frontendnpm init在npm 6+中可用。
使用Yarn
yarn create react-app react-frontend运行任何这些命令都会在当前文件夹中创建一个名为 react-frontend 的目录。在该目录中,它将生成初始项目结构并安装横向依赖。
react-frontend
├── README.md
├── node_modules
├── package.json
├── .gitignore
├── public
│   ├── favicon.ico
│   ├── index.html
│   ├── logo192.png
│   ├── logo512.png
│   ├── manifest.json
│   └── robots.txt
└── src
    ├── App.css
    ├── App.js
    ├── App.test.js
    ├── index.css
    ├── index.js
    ├── logo.svg
    └── serviceWorker.js
让我们来探索 react 项目的重要文件和文件夹。
为了使项目能够构建,这些文件必须以准确的文件名存在。
- public/index.html是页面模板。
- src/index.js是JavaScript的入口。
你可以删除或重命名其他的文件。
让我们快速浏览一下项目结构。
package.json - package.json文件包含了我们的React JS项目所需的所有依赖项。最重要的是,你可以检查你正在使用的React的当前版本。它有所有的脚本来启动、构建和弹出我们的React应用。
public文件夹 - public文件夹包含index.html。由于React是用来构建一个单页应用程序的,我们有这个单一的HTML文件来渲染我们所有的组件。基本上,它是一个HTML模板。它有一个以id为根的div元素,我们所有的组件都在这个div和index.html中被渲染成一个完整的react应用的单页。
src文件夹- 在这个文件夹中,我们有所有的全局javascript和CSS文件。所有我们要建立的不同组件都在这里。
index.js - 这是你的react应用程序的顶级渲染器。
node_modules - 所有由NPM或Yarn安装的包都在node_modules文件夹中。
App.js - App.js文件包含了我们的App组件的定义,它实际上是在浏览器中被渲染的,这是根组件。
了解更多关于创建React App的信息,请点击ReactJS + Spring Boot CRUD Full Stack App - 6 - Creating React App。
2 - React CRUD App项目结构
下面是我们React App的最终项目结构。

3 - 使用NPM在React中添加Bootstrap
打开一个新的终端窗口,导航到你的项目的文件夹,并运行以下命令:
$ npm install bootstrap --save。
安装完bootstrap包后,你需要在你的React应用入口文件中导入它。
打开src/index.js文件,添加以下代码。
import 'bootstrap/dist/css/bootstrap.min.css';src/index.js
下面是index.js文件的完整代码。
import React from 'react';
import ReactDOM from 'react-dom';
import './index.css';
import App from './App';
import * as serviceWorker from './serviceWorker';
import 'bootstrap/dist/css/bootstrap.min.css';

ReactDOM.render(
  <React.StrictMode>
    <App />
  </React.StrictMode>,
  document.getElementById('root')
);

// If you want your app to work offline and load faster, you can change
// unregister() to register() below. Note this comes with some pitfalls.
// Learn more about service workers: https://bit.ly/CRA-PWA
serviceWorker.unregister();了解更多关于如何在react中使用bootstrap的信息:ReactJS + Spring Boot CRUD Full Stack App - 7 - Add Bootstrap 4 in React App。
4 - EmployeeService - Consume CRUD REST API调用
对于我们的API调用,我们将使用Axios。以下是安装Axios的npm命令:
npm add axios。
EmployeeService.js
让我们在src文件夹中创建一个services文件夹,并创建一个名为EmployeeService.js的Javascript文件。 在这个文件中,创建EmployeeService类,并加入以下方法,通过Axios进行HTTP REST调用。
import axios from 'axios';

const EMPLOYEE_API_BASE_URL = "http://localhost:8080/api/v1/employees";

class EmployeeService {

    getEmployees(){
        return axios.get(EMPLOYEE_API_BASE_URL);
    }

    createEmployee(employee){
        return axios.post(EMPLOYEE_API_BASE_URL, employee);
    }

    getEmployeeById(employeeId){
        return axios.get(EMPLOYEE_API_BASE_URL + '/' + employeeId);
    }

    updateEmployee(employee, employeeId){
        return axios.put(EMPLOYEE_API_BASE_URL + '/' + employeeId, employee);
    }

    deleteEmployee(employeeId){
        return axios.delete(EMPLOYEE_API_BASE_URL + '/' + employeeId);
    }
}

export default new EmployeeService()
确保你创建了EmployeService类的一个对象,并将其导出为。
export default new EmployeeService();了解更多关于EmployeeService的信息:ReactJS + Spring Boot CRUD Full Stack Application。
5 - package.json
这个文件包含了我们的React JS项目所需的所有依赖项。最重要的是,你可以检查你所使用的React的当前版本。它有所有的脚本来启动、构建和弹出我们的React应用。
{
  "name": "react-frontend",
  "version": "0.1.0",
  "private": true,
  "dependencies": {
    "@testing-library/jest-dom": "^4.2.4",
    "@testing-library/react": "^9.5.0",
    "@testing-library/user-event": "^7.2.1",
    "axios": "^0.19.2",
    "bootstrap": "^4.5.0",
    "react": "^16.13.1",
    "react-dom": "^16.13.1",
    "react-router-dom": "^5.2.0",
    "react-scripts": "3.4.1"
  },
  "scripts": {
    "start": "react-scripts start",
    "build": "react-scripts build",
    "test": "react-scripts test",
    "eject": "react-scripts eject"
  },
  "eslintConfig": {
    "extends": "react-app"
  },
  "browserslist": {
    "production": [
      ">0.2%",
      "not dead",
      "not op_mini all"
    ],
    "development": [
      "last 1 chrome version",
      "last 1 firefox version",
      "last 1 safari version"
    ]
  }
}
###6 - React列表雇员组件
在这一节中,我们将在src文件夹中创建一个名为 components 的新文件夹。然后创建一个名为ListUserComponent.jsx的新文件。在这个文件中创建一个名为ListUserComponent的React类组件,内容如下。
import React, { Component } from 'react'
import EmployeeService from '../services/EmployeeService'

class ListEmployeeComponent extends Component {
    constructor(props) {
        super(props)

        this.state = {
                employees: []
        }
        this.addEmployee = this.addEmployee.bind(this);
        this.editEmployee = this.editEmployee.bind(this);
        this.deleteEmployee = this.deleteEmployee.bind(this);
    }

    deleteEmployee(id){
        EmployeeService.deleteEmployee(id).then( res => {
            this.setState({employees: this.state.employees.filter(employee => employee.id !== id)});
        });
    }
    viewEmployee(id){
        this.props.history.push(`/view-employee/${id}`);
    }
    editEmployee(id){
        this.props.history.push(`/add-employee/${id}`);
    }

    componentDidMount(){
        EmployeeService.getEmployees().then((res) => {
            this.setState({ employees: res.data});
        });
    }

    addEmployee(){
        this.props.history.push('/add-employee/_add');
    }

    render() {
        return (
            <div>
                 <h2 className="text-center">Employees List</h2>
                 <div className = "row">
                    <button className="btn btn-primary" onClick={this.addEmployee}> Add Employee</button>
                 </div>
                 <br></br>
                 <div className = "row">
                        <table className = "table table-striped table-bordered">

                            <thead>
                                <tr>
                                    <th> Employee First Name</th>
                                    <th> Employee Last Name</th>
                                    <th> Employee Email Id</th>
                                    <th> Actions</th>
                                </tr>
                            </thead>
                            <tbody>
                                {
                                    this.state.employees.map(
                                        employee =>
                                        <tr key = {employee.id}>
                                             <td> { employee.firstName} </td>
                                             <td> {employee.lastName}</td>
                                             <td> {employee.emailId}</td>
                                             <td>
                                                 <button onClick={ () => this.editEmployee(employee.id)} className="btn btn-info">Update </button>
                                                 <button style={{marginLeft: "10px"}} onClick={ () => this.deleteEmployee(employee.id)} className="btn btn-danger">Delete </button>
                                                 <button style={{marginLeft: "10px"}} onClick={ () => this.viewEmployee(employee.id)} className="btn btn-info">View </button>
                                             </td>
                                        </tr>
                                    )
                                }
                            </tbody>
                        </table>

                 </div>

            </div>
        )
    }
}

export default ListEmployeeComponent
让我们来理解上面的代码。
componentDidMount()在组件第一次被挂载时被执行。在实现中,它实际上是调用服务类方法,从API调用中获取雇员,并填充状态变量雇员:**。
componentDidMount(){
        EmployeeService.getEmployees().then((res) => {
            this.setState({ employees: res.data});
        });
}我们正在使用ES6的功能,即map operator来循环我们的**employees **列表并创建视图。
<tbody>
                                {
                                    this.state.employees.map(
                                        employee =>
                                        <tr key = {employee.id}>
                                             <td> { employee.firstName} </td>
                                             <td> {employee.lastName}</td>
                                             <td> {employee.emailId}</td>
                                             <td>
                                                 <button onClick={ () => this.editEmployee(employee.id)} className="btn btn-info">Update </button>
                                                 <button style={{marginLeft: "10px"}} onClick={ () => this.deleteEmployee(employee.id)} className="btn btn-danger">Delete </button>
                                                 <button style={{marginLeft: "10px"}} onClick={ () => this.viewEmployee(employee.id)} className="btn btn-info">View </button>
                                             </td>
                                        </tr>
                                    )
                                }
                            </tbody>
构造函数()在组件被安装之前被调用。在构造函数中,我们声明了我们的状态变量并绑定了不同的方法,这样它们就可以从render()方法中的状态中访问。
constructor(props) {
        super(props)

        this.state = {
                employees: []
        }
        this.addEmployee = this.addEmployee.bind(this);
        this.editEmployee = this.editEmployee.bind(this);
        this.deleteEmployee = this.deleteEmployee.bind(this);
}在点击删除按钮时,我们使用数组的filter()方法来过滤出被删除的雇员。
deleteEmployee(id){
        EmployeeService.deleteEmployee(id).then( res => {
            this.setState({employees: this.state.employees.filter(employee => employee.id !== id)});
        });
}随着更新按钮的点击,我们将使用以下代码导航到更新雇员页面。
editEmployee(id){
        this.props.history.push(`/add-employee/${id}`);
}点击查看按钮,我们将使用以下代码导航到查看雇员页面。
viewEmployee(id){
        this.props.history.push(`/view-employee/${id}`);
}点击添加雇员按钮,我们将使用以下代码导航到添加雇员页面。
addEmployee(){
        this.props.history.push('/add-employee/_add');
}了解更多关于ListEmployeeComponent的信息:ReactJS + Spring Boot CRUD Full Stack App - 8 - Creating React List Employee Component。
7 - 创建页眉和页脚
7.1 HeaderComponent
让我们创建一个名为HeaderComponent.js的新文件,在这个文件中,用以下代码创建一个名为HeaderComponent的组件。
import React, { Component } from 'react'

class HeaderComponent extends Component {
    constructor(props) {
        super(props)

        this.state = {

        }
    }

    render() {
        return (
            <div>
                <header>
                    <nav className="navbar navbar-expand-md navbar-dark bg-dark">
                    <div><a href="https://javaguides.net" className="navbar-brand">Employee Management App</a></div>
                    </nav>
                </header>
            </div>
        )
    }
}

export default HeaderComponent
7.2 FooterComponent
让我们创建一个名为FooterComponent.js的新文件,在该文件中创建一个名为FooterComponent的组件,代码如下。
import React, { Component } from 'react'

class FooterComponent extends Component {
    constructor(props) {
        super(props)

        this.state = {

        }
    }

    render() {
        return (
            <div>
                <footer className = "footer">
                    <span className="text-muted">All Rights Reserved 2020 @JavaGuides</span>
                </footer>
            </div>
        )
    }
}

export default FooterComponent了解更多关于在React应用程序中创建页眉和页脚的信息,请访问ReactJS + Spring Boot CRUD Full Stack App - 10 - Add Header and Footer to React App。
8 - 配置React应用程序的路由
要使用React Router,你首先要用NPM安装它:
npm install react-router-dom<<$21$>> 你需要导入BrowserRouter。
你需要从react-router-dom包中导入BrowserRouter, Route和Switch。
import React, { Component } from 'react';
import { BrowserRouter, Route, Switch } from 'react-router-dom';
让我们打开App组件并配置路由。我们使用Switch元素(open和closing标签)这些确保一次只渲染一个组件。
用以下代码替换App组件。
import React from 'react';
import logo from './logo.svg';
import './App.css';
import {BrowserRouter as Router, Route, Switch} from 'react-router-dom'
import ListEmployeeComponent from './components/ListEmployeeComponent';
import HeaderComponent from './components/HeaderComponent';
import FooterComponent from './components/FooterComponent';
import CreateEmployeeComponent from './components/CreateEmployeeComponent';
import ViewEmployeeComponent from './components/ViewEmployeeComponent';

function App() {
  return (
    <div>
        <Router>
              <HeaderComponent />
                <div className="container">
                    <Switch>
                          <Route path = "/" exact component = {ListEmployeeComponent}></Route>
                          <Route path = "/employees" component = {ListEmployeeComponent}></Route>
                          <Route path = "/add-employee/:id" component = {CreateEmployeeComponent}></Route>
                          <Route path = "/view-employee/:id" component = {ViewEmployeeComponent}></Route>
                          {/* <Route path = "/update-employee/:id" component = {UpdateEmployeeComponent}></Route> */}
                    </Switch>
                </div>
              <FooterComponent />
        </Router>
    </div>

  );
}

export default App;在ReactJS + Spring Boot CRUD Full Stack App - 11 - Configure Routing了解更多上述路由配置。
9 - 添加和更新雇员组件
在本节中,我们将实现添加雇员和更新雇员的功能。我们将使用同一个React组件来执行添加和更新雇员的操作。
让我们创建一个名为CreateEmployeeComponent.jsx的新文件。在这个文件中创建一个名为CreateEmployeeComponent的React类组件,内容如下。
import React, { Component } from 'react'
import EmployeeService from '../services/EmployeeService';

class CreateEmployeeComponent extends Component {
    constructor(props) {
        super(props)

        this.state = {
            // step 2
            id: this.props.match.params.id,
            firstName: '',
            lastName: '',
            emailId: ''
        }
        this.changeFirstNameHandler = this.changeFirstNameHandler.bind(this);
        this.changeLastNameHandler = this.changeLastNameHandler.bind(this);
        this.saveOrUpdateEmployee = this.saveOrUpdateEmployee.bind(this);
    }

    // step 3
    componentDidMount(){

        // step 4
        if(this.state.id === '_add'){
            return
        }else{
            EmployeeService.getEmployeeById(this.state.id).then( (res) =>{
                let employee = res.data;
                this.setState({firstName: employee.firstName,
                    lastName: employee.lastName,
                    emailId : employee.emailId
                });
            });
        }
    }
    saveOrUpdateEmployee = (e) => {
        e.preventDefault();
        let employee = {firstName: this.state.firstName, lastName: this.state.lastName, emailId: this.state.emailId};
        console.log('employee => ' + JSON.stringify(employee));

        // step 5
        if(this.state.id === '_add'){
            EmployeeService.createEmployee(employee).then(res =>{
                this.props.history.push('/employees');
            });
        }else{
            EmployeeService.updateEmployee(employee, this.state.id).then( res => {
                this.props.history.push('/employees');
            });
        }
    }

    changeFirstNameHandler= (event) => {
        this.setState({firstName: event.target.value});
    }

    changeLastNameHandler= (event) => {
        this.setState({lastName: event.target.value});
    }

    changeEmailHandler= (event) => {
        this.setState({emailId: event.target.value});
    }

    cancel(){
        this.props.history.push('/employees');
    }

    getTitle(){
        if(this.state.id === '_add'){
            return <h3 className="text-center">Add Employee</h3>
        }else{
            return <h3 className="text-center">Update Employee</h3>
        }
    }
    render() {
        return (
            <div>
                <br></br>
                   <div className = "container">
                        <div className = "row">
                            <div className = "card col-md-6 offset-md-3 offset-md-3">
                                {
                                    this.getTitle()
                                }
                                <div className = "card-body">
                                    <form>
                                        <div className = "form-group">
                                            <label> First Name: </label>
                                            <input placeholder="First Name" name="firstName" className="form-control"
                                                value={this.state.firstName} onChange={this.changeFirstNameHandler}/>
                                        </div>
                                        <div className = "form-group">
                                            <label> Last Name: </label>
                                            <input placeholder="Last Name" name="lastName" className="form-control"
                                                value={this.state.lastName} onChange={this.changeLastNameHandler}/>
                                        </div>
                                        <div className = "form-group">
                                            <label> Email Id: </label>
                                            <input placeholder="Email Address" name="emailId" className="form-control"
                                                value={this.state.emailId} onChange={this.changeEmailHandler}/>
                                        </div>

                                        <button className="btn btn-success" onClick={this.saveOrUpdateEmployee}>Save</button>
                                        <button className="btn btn-danger" onClick={this.cancel.bind(this)} style={{marginLeft: "10px"}}>Cancel</button>
                                    </form>
                                </div>
                            </div>
                        </div>

                   </div>
            </div>
        )
    }
}

export default CreateEmployeeComponent
让我们来理解上面的代码。
我们使用下面这行代码从路由中检索雇员ID:
this.props.match.params.id。
在构造函数中,我们声明了我们的状态变量,并绑定了不同的方法,以便它们可以从render()方法里面的状态中访问。
constructor(props) {
        super(props)

        this.state = {
            // step 2
            id: this.props.match.params.id,
            firstName: '',
            lastName: '',
            emailId: ''
        }
        this.changeFirstNameHandler = this.changeFirstNameHandler.bind(this);
        this.changeLastNameHandler = this.changeLastNameHandler.bind(this);
        this.saveOrUpdateEmployee = this.saveOrUpdateEmployee.bind(this);
    }
componentDidMount()在组件第一次被安装时被执行。在componentDidMount()方法中,如果id是**'_add'**,那么我们就不做其他事情,而是使用EmployeeService.getEmployeeById()方法检索雇员的id。
componentDidMount(){

        // step 4
        if(this.state.id === '_add'){
            return
        }else{
            EmployeeService.getEmployeeById(this.state.id).then( (res) =>{
                let employee = res.data;
                this.setState({firstName: employee.firstName,
                    lastName: employee.lastName,
                    emailId : employee.emailId
                });
            });
        }
}在saveOrUpdateEmployee()方法中,我们检查id是否为_add,然后我们调用EmployeeService.createEmployee()方法,在内部进行REST API调用,将员工数据存储到数据库。如果id是任何正数,那么我们就调用EmployeeService.updateEmployee()方法,该方法在内部进行REST API调用,将更新的雇员数据存储到数据库中。
saveOrUpdateEmployee = (e) => {
        e.preventDefault();
        let employee = {firstName: this.state.firstName, lastName: this.state.lastName, emailId: this.state.emailId};
        console.log('employee => ' + JSON.stringify(employee));

        // step 5
        if(this.state.id === '_add'){
            EmployeeService.createEmployee(employee).then(res =>{
                this.props.history.push('/employees');
            });
        }else{
            EmployeeService.updateEmployee(employee, this.state.id).then( res => {
                this.props.history.push('/employees');
            });
        }
    }
我们使用getTitle()方法来获取基于id的添加和雇员页面的标题。
getTitle(){
        if(this.state.id === '_add'){
            return <h3 className="text-center">Add Employee</h3>
        }else{
            return <h3 className="text-center">Update Employee</h3>
        }
}当点击取消按钮时,cancel()方法被调用,它将把用户导航到雇员列表页。
cancel(){
        this.props.history.push('/employees');
}在ReactJS + Spring Boot CRUD Full Stack App - 13 - Creating React Add Employee Component了解更多关于CreateEmployeeConponent的信息。
10 - 查看雇员组件
让我们创建一个名为ViewEmployeeComponent.jsx的新文件。在这个文件中创建一个名为ViewEmployeeComponent的React类组件,内容如下。
import React, { Component } from 'react'
import EmployeeService from '../services/EmployeeService'

class ViewEmployeeComponent extends Component {
    constructor(props) {
        super(props)

        this.state = {
            id: this.props.match.params.id,
            employee: {}
        }
    }

    componentDidMount(){
        EmployeeService.getEmployeeById(this.state.id).then( res => {
            this.setState({employee: res.data});
        })
    }

    render() {
        return (
            <div>
                <br></br>
                <div className = "card col-md-6 offset-md-3">
                    <h3 className = "text-center"> View Employee Details</h3>
                    <div className = "card-body">
                        <div className = "row">
                            <label> Employee First Name: </label>
                            <div> { this.state.employee.firstName }</div>
                        </div>
                        <div className = "row">
                            <label> Employee Last Name: </label>
                            <div> { this.state.employee.lastName }</div>
                        </div>
                        <div className = "row">
                            <label> Employee Email ID: </label>
                            <div> { this.state.employee.emailId }</div>
                        </div>
                    </div>

                </div>
            </div>
        )
    }
}

export default ViewEmployeeComponent在ReactJS + Spring Boot CRUD Full Stack App - 13 - Creating React Add Employee Component了解更多关于ViewEmployeeConponent的信息。
###11 - 运行React App
在运行React App之前,确保你的Spring boot项目已经启动并运行。
使用下面的命令来启动该项目:
npm start。
使用yarn来启动项目。
yarn start在开发模式下运行该应用程序。打开http://localhost:3000,在浏览器中查看。
##12 - 全栈式应用程序的演示
这个项目的演示是下面的YouTube视频教程系列。
源代码在GitHub上
https://github.com/RameshMF/ReactJS-Spring-Boot-CRUD-Full-Stack-App/tree/master/react-frontend
MongoDBReactJSSpring Boot
版权说明 : 本文为转载文章, 版权归原作者所有 版权申明
原文链接 : https://www.javaguides.net/2021/08/react-spring-boot-mongodb-crud-example.html
内容来源于网络,如有侵权,请联系作者删除!
相关文章

热门标签
更多最新文章
更多- 浏览(301) 发布于 2022-09-21
- 浏览(346) 发布于 2022-03-05
- 浏览(407) 发布于 2022-03-05
- 浏览(314) 发布于 2022-03-05
- 浏览(332) 发布于 2022-03-04