Nginx 基础入门

Nginx从入门到入土,本文总结了:什么是Nginx、Nginx优势有哪些、如何部署Nginx、Nginx配置文件含义、Nginx虚拟主机、如何自定义网站、Nginx日志、个性404页面、Nginx模块、HTTP&HTTPS、Rewrite重定向,Nginx平滑升级!文章较长,希望可以帮到大家,耐心看完对你有绝对的收获!如有错误请指正~
Nginx 基础入门

1、Nginx简介
百度解释:Nginx是一款轻量级的Web 服务器/反向代理服务器及电子邮件(IMAP/POP3)代理服务器,在BSD-like 协议下发行。其特点是占有内存少,并发能力强,事实上nginx的并发能力在同类型的网页服务器中表现较好,中国大陆使用nginx网站用户有:百度、京东、新浪、网易、腾讯、淘宝等。
总结:Nginx(engine x)是一个高性能的HTTP(解决C10k的问题)和反向代理服务器,能够实现动静分离技术(动态请求和静态请求),也是一个IMAP/POP3/SMTP服务器,
1.1、相关名词解释
HTTP:HTTP的服务器端实现程序有httpd、nginx等,而且nginx支持高并发!👉HTTP
反向代理:反向代理服务器位于用户与目标服务器之间,但是对于用户而言,反向代理服务器就相当于目标服务器,即用户直接访问反向代理服务器就可以获得目标服务器的资源。同时,用户不需要知道目标服务器的地址,也无须在用户端作任何设定。反向代理服务器通常可用来作为Web加速,即使用反向代理作为Web服务器的前置机来降低网络和服务器的负载,提高访问效率。👉反向代理
SMTP:SMTP是一种提供可靠且有效的电子邮件传输的协议。(非重点)
2、Nginx优势
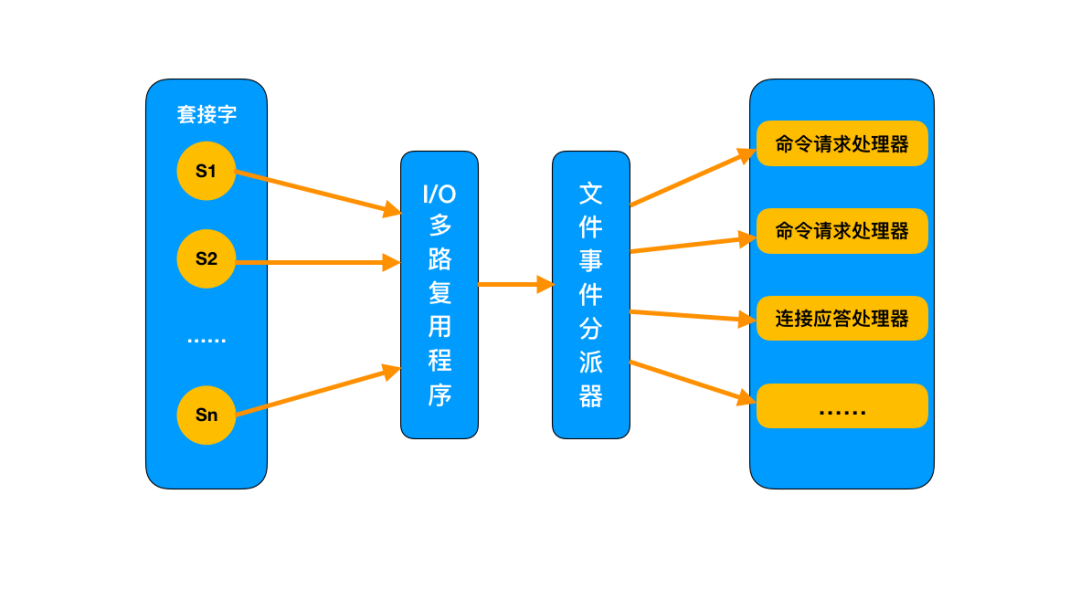
nginx优势:高并发、I/O多路复用、epoll模型:异步且非阻塞
I/O多路复用(重点)
理论:I是input输入,O是output输出,nginx的I/O多路复用,提高了服务器的吞吐能力,同一个线程里面,通过开关的方式,来同时传输多个I/O流,比如你去帮同事解决问题,A同事问你错误原因,B同时问你怎么安装的问题,你同时去帮他们解决;
技术分类:select、poll、epoll(epoll模块实现I/O多路复用)
特点:异步、非阻塞
特点比喻:
同步:比如AB石头剪刀布同时出为同步
异步:石头剪刀布不同时出异步
阻塞:去上厕所,不上完厕所不去干别的事
非阻塞:厕所人多可以先去忙别的
- 时分多路复用:时分多路复用(Time-Division Multiplexing,TDM)是一种数字或者模拟(较罕见)的多路复用技术,比如CPU的分时计算,你想去听歌或者看电影,CPU需要不断的切换去处理你的个人需求,把时间分成块,只不过处理的比较快,个人感觉不到。
- 频分多路复用:频分多路复用,是在适于某种传输媒质的传输频带内,若干个频谱互不重叠的信号一并传输的方式,比如现在既可以打电话也可以上网,就是用到了此技术。
3、Nginx部署
👉Nginx官网
选择download
- 编译安装
如果需要平滑增加模块使用此安装

- yum安装:nginx: Linux packages
如果不需要指定模块,此安装会自动安装很多模块

推荐yum安装,去官网找仓库,配置文件不需要改,主线版本不要打开~使用稳定版就行
- 如何安装我总结在此博文Nginx部署
4、Nginx配置文件
查看相关配置文件:rpm -ql nginx
[root@web01 ~]# rpm -ql nginx
/etc/logrotate.d/nginx   # 日志轮转文件*
/etc/nginx/nginx.conf		# 总配置文件*
/etc/nginx/conf.d  # 子配置文件*
/etc/nginx/conf.d/default.conf  #默认网站配置文件 *

/etc/nginx/fastcgi_params   # 动态网站模块文件-python,php所需的相关变量
/etc/nginx/scgi_params
/etc/nginx/uwsgi_params

/etc/nginx/mime.types  # 文件关联程序:网站文件类型和相关处理程序
/etc/nginx/modules # nginx模块文件

/usr/lib/systemd/system/nginx-debug.service  # nginx调试程序启动脚本
/usr/lib/systemd/system/nginx.service

/usr/lib64/nginx
/usr/lib64/nginx/modules
/usr/libexec/initscripts/legacy-actions/nginx
/usr/libexec/initscripts/legacy-actions/nginx/check-reload
/usr/libexec/initscripts/legacy-actions/nginx/upgrade

/usr/sbin/nginx  # 主程序
/usr/sbin/nginx-debug # 调试程序

# man nginx手册文件如下
/usr/share/doc/nginx-1.20.2
/usr/share/doc/nginx-1.20.2/COPYRIGHT
/usr/share/man/man8/nginx.8.gz
/usr/share/nginx
/usr/share/nginx/html
/usr/share/nginx/html/50x.html
/usr/share/nginx/html/index.html

/var/cache/nginx   # 缓存文件
/var/log/nginx   # 日志文件
5、Nginx模块
yum安装,自带的模块剖析
# yum安装的模块如下都安装好了,模块是固定的,如果想自定义增加模块使用编译安装才可以

[root@web01 sbin]# nginx -V
nginx version: nginx/1.20.2
built by gcc 4.8.5 20150623 (Red Hat 4.8.5-44) (GCC)
built with OpenSSL 1.0.2k-fips  26 Jan 2017
TLS SNI support enabled

configure arguments:
--prefix=/etc/nginx  # 指定安装路径
--sbin-path=/usr/sbin/nginx  # 程序文件位置
--modules-path=/usr/lib64/nginx/modules  # 模块路径的位置
--conf-path=/etc/nginx/nginx.conf  # 主配置文件的位置
--error-log-path=/var/log/nginx/error.log # 错误日志位置
--http-log-path=/var/log/nginx/access.log   # 访问日志位置
--pid-path=/var/run/nginx.pid  # 程序PID
--lock-path=/var/run/nginx.lock  # 锁路径,防止重复启动nginx
--http-client-body-temp-path=/var/cache/nginx/client_temp   # 缓存
--http-proxy-temp-path=/var/cache/nginx/proxy_temp  # 代理缓存
--http-fastcgi-temp-path=/var/cache/nginx/fastcgi_temp   # php缓存
--http-uwsgi-temp-path=/var/cache/nginx/uwsgi_temp  # python缓存位置
--http-scgi-temp-path=/var/cache/nginx/scgi_temp --user=nginx  # 用户
--group=nginx  # 组
--with-compat # 启动动态模块兼容
--with-file-aio  # 提高性能
--with-threads   # 多线程模块
--with-http_addition_module  #  响应之前或者之后追加文本内容
--with-http_auth_request_module  # 认证模块,比如登录密码
--with-http_dav_module #  增加上传PUT,DELETE,MKCOL:创建集合,COPY和MOVE方法)默认情况下为关闭
--with-http_flv_module # NGINX添加MP4、FLV视频支持模块

--with-http_gunzip_module  # 压缩模块
--with-http_gzip_static_module  # 压缩模块
--with-http_mp4_module  # 支持多媒体
--with-http_random_index_module  # 随机主页
--with-http_realip_module  # nginx获取真实ip模块
--with-http_secure_link_module  # nginx安全下载模块
--with-http_slice_module  # nginx中文文档
--with-http_ssl_module  # 网站加密
--with-http_stub_status_module  # 访问状态
--with-http_sub_module  # nginx替换响应内容
--with-http_v2_module  # web2.0技术

# 邮局
--with-mail  # 邮件
--with-mail_ssl_module

# 负载均衡反向代理模块
--with-stream
--with-stream_realip_module
--with-stream_ssl_module
--with-stream_ssl_preread_module

# CPU优化参数等
--with-cc-opt='-O2 -g -pipe -Wall -Wp,-D_FORTIFY_SOURCE=2 -fexceptions -fstack-protector-strong --param=ssp-buffer-size=4 -grecord-gcc-switches -m64 -mtune=generic -fPIC' --with-ld-opt='-Wl,-z,relro -Wl,-z,now -pie'
编译安装如何平滑增加模块?我总结在此博文
👉nginx平滑增加模块
6、Nginx配置文件

nginx分为全局配置和模块配置
相关文件:/etc/nginx/nginx.conf (主配置文件)

配置文件内容
1、全局/核心块。配置影响nginx全局的指令。一般有运行nginx服务器的用户组,nginx进程pid存放路径,日志存放路径,配置文件引入,元许生成workerprocess数等。

user  nginx;  # 指定Nginx的启动用户
worker_processes  auto;  # 开启nginx的数量,可以自定义,建议和CPu一样多,2核就写2个···

error_log  /var/log/nginx/error.log notice; # 错误日志
pid        /var/run/nginx.pid;    # 进程号存放路径

2、events块,配置影响nginx服务器或与用户的网络连接。有每个进程的最大连接数,选取哪种事件驱动模型处理连接请求,是否允许同时接受多个网路连接,开启多个网络连接序列化等。

events {
    worker_connections  1024;  # 进程最大连接数
}

3、http模块:可以嵌套多个server,配置代理,缓存,日志定义等绝大多数功能和第三方模块的配置。如文件引入,mime-type定义,日志自定义,是否使用sendfile传输文件,连接超时时间,单连接请求数等。

http {
    include       /etc/nginx/mime.types;  # 加载外部的配置项,降低了文件的复杂度
    default_type  application/octet-stream;  # 字节流处理方式

    log_format  main  '$remote_addr - $remote_user [$time_local] "$request" '
                      '$status $body_bytes_sent "$http_referer" '
                      '"$http_user_agent" "$http_x_forwarded_for"';    # 日志格式,可以修改为json

    access_log  /var/log/nginx/access.log  main; # 访问日志

    sendfile        on;  # 加速访问、高效读取文件
    #tcp_nopush     on;  # 优化

    keepalive_timeout  65;  # 长连接,timeout不能太低,不然和短链接一样

    #gzip  on;  # 压缩
    include /etc/nginx/conf.d/*.conf;  # 配置文件
}
4、server块:配置虚拟主机的相关参数,一个http中可以有多个server
5、location块:配置请求的路由,以及各种页面的处理情况- nginx配置结构分为三层 http > server > location
- http 包含一到多个server, server包含一到多个location
- 配置项的优先级分别是location, server, http
http {
	...
	access_log /var/logs/nginx/nginx.log;

	server {
		server_name A;
		...
		access_log /var/logs/nginx/serverA/nginx.log;

		location / {
				...
				access_log /var/logs/nginx/serverA/localtion/nginx.log;
		}
	}
}- 匹配到server A,localtion /时日志会记录到 /var/logs/nginx/serverA/localtion/nginx.log
- 匹配到server A 其他location时日志会记录到/var/logs/nginx/serverA/nginx.log
- 默认请求日志记录到 /var/logs/nginx/nginx.log;
6.1、Location配置优先级
使用Nginx Location可以控制访问网站的路径, 但一个server可以有多个location配置, 多个location的优先级该如何区分,就用到了location配置的优先级~
6.1.1、location匹配符号
| 匹配符 | 匹配规则 | 优先级 |
|---|---|---|
| = | 精确匹配 | 1 |
| ^~ | 以某个字符串开头 | 2 |
| ~ | 区分大小写的正则匹配 | 3 |
| ~* | 不区分大小写的正则匹配 | 3 |
| / | 通用匹配,任何请求都会匹配到 | 4 |
=号优先级最高
server {
    listen 80;
    server_name _;

    location ~* /python {
        default_type text/html;
        return 200 "Location ~*";
    }

    location ~ /Python {
        default_type text/html;
        return 200 "Location ~";
    }

    location ^~ /python {
        default_type text/html;
        return 200 "Location ^~";
    }

    location = /python {
        default_type text/html;
        return 200 "Location =";
    }
}
6.2、http、server、location三者关系(通俗理解)
- http:通俗理解为整个服务器,如果在http下添加配置,那么整个服务器的网站都会受影响,不管是网站A,还是网站B,或者网站中的某一个页面
- server:通俗理解为服务器中的一个网站,在server中配置,那么受影响的只有该网站;
- location:通俗理解为网站的某一个页面,如果在location下配置,那么受影响的只有该server的该页面;
6.3、include : 加载外部的配置项
相关文件/etc/nginx/conf.d/*.conf
# 重点
server : 网址模块,每一个server代表一个网站,可以有多个
listen : 监听的端口
server_name : 定义域名
location {} : 访问路径
	root : 指定网址路径
	index : 指定网址的索引文件
👉Nginx配置文件博文
Nginx如何yum安装和编译安装以及配置文件剖析和游戏案例我编写在如上博文👆
7、Nginx虚拟主机
三种方式,示例是自己创的网站,只要以.conf都可以被识别
- 相关文件目录:/etc/nginx/conf.d (子配置文件)
# 默认配置文件/etc/nginx/conf.d/default.conf
[root@web01 conf.d]# cat /etc/nginx/conf.d/default.conf
   server {
    listen       80;  # 端口
    server_name  localhost;   # 域名

    #access_log  /var/log/nginx/host.access.log  main;  # 日志和格式

    location / {
        root   /usr/share/nginx/html;   # 存放网站目录,这里是默认网站
        index  index.html index.htm;  # 默认主页文件名
    }

    error_page   500 502 503 504  /50x.html;
    location = /50x.html {
        root   /usr/share/nginx/html;
    }    # 错误页面
}自定义页面建议在子配置目录下创建以.conf结尾的文件
7.1、自定义网站
# 自定义配置文件
[root@web01 ~]# vim /etc/nginx/conf.d/hammer.conf
server{
    listen 80;
    server_name www.hammer.com;
    location / {
        root /opt/Hammer;
        index index.html;
}
}
# 创建目录 /opt/Hammer
[root@web01 ~]# mkdir /opt/Hammer
# 写入内容
[root@web01 chess]# echo "欢迎来到HammerZe的博客" > /opt/Hammer/index.html
# 测试配置文件
[root@web01 conf.d]# nginx -t
nginx: the configuration file /etc/nginx/nginx.conf syntax is ok
nginx: configuration file /etc/nginx/nginx.conf test is successful
# 域名解析
在windows中hosts文件解析
# 重启服务.
[root@web01 conf.d]# systemctl restart nginx
# 测试是否能访问
去浏览器测试
补充知识:elinks字符浏览器,格式:elinks [域名]
7.2、三种方式
总结在以下博文
👉三种方式
7.2.1、基于多IP的方式
# 防止其他配置文件影响,将所有配置文件压缩
[root@web01 conf.d]# gzip Mario.conf
[root@web01 conf.d]# gzip chess.conf.gz
[root@web01 conf.d]# gzip default.conf.gz
# 编辑配置文件
[root@web01 ~]# cd /etc/nginx/conf.d
[root@web01 conf.d]# vim game.conf
server {
    listen 80;
    server_name 192.168.15.7;
    location / {
	root /opt/Super_Mario;  # 需要创建
        index index.html;
    }
}
server {
    listen 80;
    server_name 172.16.1.7;
    location / {
        root /opt/chess;
        index index.html;
    }
}

# 测试配置文件
[root@web01 conf.d]# nginx -t
nginx: the configuration file /etc/nginx/nginx.conf syntax is ok
nginx: configuration file /etc/nginx/nginx.conf test is successfu
# 重启服务
[root@web01 conf.d]# systemctl restart nginx
7.2.2、基于多端口的方式
# 编辑配置文件
[root@web01 conf.d]# vim game1.conf
server {
    listen 80;
    server_name 192.168.15.7;
    location / {
        root /opt/Super_Mario;
        index index.html;
    }
}
server {
    listen 81;
    server_name 192.168.15.7;
    location / {
        root /opt/chess;
        index index.html;
    }
}
7.2.3、基于多域名的方式
# 编辑配置文件
[root@web01 conf.d]# vim game2.conf
server {
    listen 80;
    server_name www.Super_Mario.com;
    location / {
        root /opt/Super_Mario;
        index index.html;
    }
}
server {
    listen 80;
    server_name www.chesss.com;
    location / {
        root /opt/chess;
        index index.html;
    }
}
# 注意域名不能用chess
2和3其余步骤和1一样
8、Nginx 日志
8.1、日志配置
👉官网文档:Module ngx_http_log_module (nginx.org)
8.1.1、日志模块名称
ngx_http_log_module
8.1.2、相关指令
- log_format :日志格式
- access_log :正确访问进程日志
- error_log:错误日志
- open_log_file_cache:日志缓存
8.1.3、日志格式和命令
相关文件:/etc/nginx/nginx.conf
# 查看nginx的主配置文件
[root@ze nginx]# cat /etc/nginx/nginx.conf
log_format  main  '$remote_addr - $remote_user [$time_local] "$request" '
                      '$status $body_bytes_sent "$http_referer" '
                      '"$http_user_agent" "$http_x_forwarded_for"';
 access_log  /var/log/nginx/access.log  main; # 这里的main格式和上面的main对应


 # 配置详解
$remote_addr:远程地址,记录客户端IP地址
- :分隔符
$remote_user:代表登录用户名(没有就用-代替)
[$time_local] :本地时间
$request:请求方式、类型(post,get···)
request:包括请求方式,访问文件,连接方式(HTTP/1.1长连接)
$status :状态码 (200,404,502·····)
$body_bytes_sent :访问文件大小
$http_referer:访问域名,跳转地址(超链接)
$http_user_agent:客户端标识
$http_x_forwarded_for:真实的客户端IP(在反向代理中生效,代理地址)
监控日志
- tail -f /var/log/nginx/access.log
- tail -f /var/log/nginx/error.log
8.2、个性化404页面
个性化404页面是用于美化页面,或者优化操作,提升了用户的体验!
# 定义404页面路径
[root@ze ze]# vim /etc/nginx/conf.d/zeself.conf
server{
    listen 80;
    server_name www.zemake.com;
    location / {
        root /opt/ze;
        index index.html zemake.html;
    }
    error_page 404 /404.html;
    location = /404.html {
    root /opt/ze;
    }
}
# 自定义404界面
[root@ze ze]# vim /opt/ze/404.html
<img src="404.jpg"/ >

# 上传404个性图片
[root@ze ze]# ll
-rw-r--r-- 1 root root 84134 Jan  8 14:52 404.jpg
# 重启
[root@ze ze]# systemctl restart nginx
如果是编译安装的nginx还可以修改nginx和版本号,请看我总结在如下博文中👇
👉编译安装nginx自定义404界面

8.3、日志缓存
当浏览器大量访问到来时,对于每一条日志记录,都是先打开文件,再写入日志,然后关闭,占用了系统的I/O,与业务无关!可以通过open_log_file_cache来设置;(一般不用设置)
语法:
open_log_file_cache max=1000 inactive=20s min_uses=3 valid=1m;系统默认:open_log_file_cache off;
作用范围:http、server、location
参数剖析:
max 1000指的是日志文件的FD,最大的缓存数量为1000;如果缓存数量超了,
min_users3是20秒内小于3次访问的FD,就给你清掉,结合inactive 20s的时间;valid 1m检查周期为1分钟。总结:缓存最多1000个,到了极限.每分钟开始清除掉20秒内小于3次的文件FD(FD:文件关联),节省了系统的I/O;
# 设置缓存配置
[root@ze conf.d]# cat /etc/nginx/conf.d/zeself.conf
server{
    open_log_file_cache max=1000 inactive=20s min_uses=3 valid=1m;
    listen 80;
    server_name www.zemake.com;
    location / {
        root /opt/ze;
        index index.html zemake.html;
    }
    error_page 404 /404.html;
    location = /404.html {
    root /opt/ze;
    }
}
[root@ze conf.d]# nginx -t
nginx: the configuration file /etc/nginx/nginx.conf syntax is ok
nginx: configuration file /etc/nginx/nginx.conf test is successful
[root@ze conf.d]# systemctl restart nginx
8.4、日志轮转 / 切割
Nginx安装,会默认启动日志轮转,可以通过rpm -ql nginx|grep log过滤出日志轮转文件;
日志轮转、切割是为了更好的节省空间
- 日志轮转文件:/etc/logrotate.d/nginx
- 日志目录:/var/log/nginx/
[root@ze nginx]# cat /etc/logrotate.d/nginx
/var/log/nginx/*.log {  # 针对.log结尾的日志文件
        daily   # 轮转周期,以天为单位
        missingok   # 文件丢失不提示
        rotate 52   # 保留52天
        compress   # 日志轮转后压缩,节省资源
        delaycompress  # 暂缓压缩
        notifempty   # 空文件不轮转
        create 640 nginx adm  # 日志切割之后创建新文件nginx为数主,adm为数组,权限640
        # 下面是切割完重启
        sharedscripts
        postrotate
                if [ -f /var/run/nginx.pid ]; then
                        kill -USR1 `cat /var/run/nginx.pid`
                fi
        endscript
}
8.5、日志分析
知道日志格式是什么,日志的字段[8.1],统计用户访问情况,页面流量,统计PV,UV···等
# 分析的字段
$remote_addr:远程地址,记录客户端IP地址
$remote_user:代表登录用户名(没有就用-代替)
[$time_local] :本地时间
$request:请求方式、类型(post,get···)
request:包括请求方式,访问文件,连接方式(HTTP/1.1长连接)
$status :状态码 (200,404,502·····)
$body_bytes_sent :访问文件大小
$http_referer:访问域名,跳转地址(超链接)
$http_user_agent:客户端标识
$http_x_forwarded_for:真实的客户端IP(在反向代理中生效,代理地址)
8.5.1、 PV、UV、IP
8.5.1.1、简介
PV(Page View)访问量, 即页面浏览量或点击量,衡量网站用户访问的网页数量;在一定统计周期内用户每打开或刷新一个页面就记录1次,多次打开或刷新同一页面则浏览量累计 。
访问量指PV指网站页面的浏览量,页面被刷新一次就计算一次。如果网站被刷新了1000次,那么流量统计工具显示的PV就是1000
UV(Unique Visitor)独立访客,统计1天内访问某站点的用户数(以cookie为依据);访问网站的一台电脑客户端为一个访客。可以理解成访问某网站的电脑的数量。网站判断来访电脑的身份是通过来访电脑的cookies实现的。如果更换了IP后但不清除cookies,再访问相同网站,该网站的统计中UV数是不变的。如果用户不保存cookies访问、清除了cookies或者更换设备访问,计数会加1。00:00-24:00内相同的客户端多次访问只计为1个访客。
IP(Internet Protocol)独立IP数,是指1天内多少个独立的IP浏览了页面,即统计不同的IP浏览用户数量。
8.5.1.2、三者关系
PV是和IP的数量是成正比的,因为页面被刷新一次那么PV就会被记录一次,所以IP越多,说明网站的PV数据也就随之增多。但是需要注意的是PV并不是访问网站的用户数量,而是网站被访问的页面数量。因为一个访问者可以多次刷新页面,增加PV数量 。
| 关系 | 描述 |
|---|---|
| PV>UV | 页面访问数,一定会大于独立用户访问数 |
| UV>IP | 10个用户在同一个局域网使用同一个IP访问相同网页,此UV=10,IP=1。 |
| IP>UV | 1个用户网络频繁掉线,重复了10次联网登录网页,此时UV=1,IP=10。 |
👉参考博文:PV、UV、IP
8.5.2、分析案例
1、 统计一天内访问最多的10个ip
日期:日/月/年:时:分:秒 -> 01/Sep/2022
 grep '日期' [日志路径] | awk '{arry[$1]++}END{for(i in ips ){print i , arry[i]}}'|sort -k2 -rn

2、 统计每个URL访问内容总大小($body_bytes_sent)
grep '日期' [日志路径]| awk '{urls[$7]++;size[$7]+=$10}END{for(i in urls){print "次数" urls[i],"体积" size[i], "内容" i}}'| sort -kl -rn | head -10

3、统计IP访问状态码为404和出现的次数($status)
grep '日期' [日志路径] | awk '{if($9="404"){ip_code[$1"   "$9]++}}END{for(i in ip_code){print i,ip_code[i]l}}'

4、统计前一分钟的PV量
date=$(date -d '-1 minute'+%Y:9%H:%M); awk -v awkdate=$date '$0 ~ date{it+}END{print i}' /var/log/nginx/access.log
9、Nginx Web 模块
模块信息都可以在官网查看,示例等;
9.1、连接状态模块
模块名称:
ngx_http_stub_status_module--with-http_stub_status_module语法:
stub_status;作用范围:server
,location
如果是编译安装的nginx是没有此模块的,需要./configure --help查看要安装的模块名
# 格式示例
location  /basic_status {
    stub_status;
}

# 配置文件
server{
    # 日志缓存
    open_log_file_cache max=1000 inactive=20s min_uses=3 valid=1m;
    listen 80;
    server_name www.zemake.com;
    location / {
        root /opt/ze;
        index index.html zemake.html; # 网页根页面
        # stub_status;
    }
    location /status {
    stub_status;
    allow all;
    }
    error_page 404 /404.html;
    location = /404.html {
    root /opt/ze;
    }
}
- Active connections :当前活动的连接数(用户数)
- server accepts handled requests:服务器接受处理请求
- 2:总连接数
- 2:成功连接数
- 10:总共处理的请求数
- Reading:0 :读取客户端Header的信息数,请求头
- Writing:1:返回给客户端的Header的信息署,响应头
- Waiting:1:等待的请求书,开启了keepalive(长连接)
9.1.1、keepalive长连接
补充知识:
长连接的存在解决了客户端和服务端每次通信需要**TCP三次握手和四次断开浪费资源的情况,在使用长连接**的情况下,当一个网页打开完成后,客户端和服务器之间用于传输HTTP数据的TCP连接不会关闭,客户端再次访问这个服务器时,会继续使用这一条已经建立的连接。
如果一直长连接是不是也在浪费资源呢?那么就可以使用Httpd守护进程,来通过**keep-alive timeout设置时间参数,Nginx中提供的是keepalive_timeout参数,如果通信建立长连接,当HTTP产生的TCP连接传输完最后一个响应,还需要再等待一段时间,就是keepalive_timeout**设置的,如果超过这段时间,浏览器没有接收到HTTP的请求,那么才会关闭这个连接,双方才会回收资源;如果在规定的时间内接收到HTTP请求,会一直保持这个连接!

注意:长连接设置的时间不能太短,不然和短连接没啥区别!
9.2、随机主页模块
微更新,将主页设置成随机页面,是一种微更新机制
模块名称:
ngx_http_random_index_module--with-http_random_index_module语法:random_index
on|off;系统默认:关闭状态(random_index off;)
作用范围:location
# 格式示例
location / {
    random_index on;
}
# 示例
1、创建主页目录
mkdir /app
2、创建多个主页,在多个文件中写入不同内容
touch /app{blue.html,green.html,red.html,.yellow.html}
[root@ze app]# cat red.html
<html>
<head>
<title>red color</title>
</head>
<body stytle="background-color:red">
<h1>red color</h1>
</body>
</html>
3、配置文件
location / {
# root /usr/share/nginx/html;
# index index.html index.htm;
root /app;
random_index on;
}9.3、替换模块
网页内容替换,如果我们用模板生成网站的时候,因为疏漏或者别的原因造成代码不如意,但是此时因为文件数量巨大,不方便全部重新生成,那么这个时候我们就可以用此模块来暂时实现纠错。另一方面,我们也可以利用这个实现服务器端文字过滤的效果。
模块名称:
ngx_http_sub_module--with-http_sub_module使用此模块是临时修改,只是为了在网页出错的时候给用户呈现正确的结果
语法:
**sub_filter**``*string*``*replacement*;作用范围:
http,server,location启动替换1:
启动替换2:
# 官网示例
location / {
    sub_filter '<a href="http://127.0.0.1:8080/'  '<a href="https://$host/';
    sub_filter '<img src="http://127.0.0.1:8080/' '<img src="https://$host/';
    sub_filter_once on;
}
# 启动替换1示例
[root@ze conf.d]# vim /etc/nginx/conf.d/default.conf
server {
sub_filter 'nginx' 'blogs';
sub_filter_once on; # 替换一次
# sub_filter_once off; # 全部替换
}
# 将默认的nginx的主页中,nginx修改为blogs替换一次:sub_filter_once on;

全部替换:sub_filter_once off;

9.4、文件读取模块
模块名:
ngx_http_core_modulesendfile模块:加速服务器的拷贝时间,优化服务器的,默认是开启的;
语法:sendfile****on | off;
tcp_nopush模块:提升了网络传输效率,默认是关闭的,当要发送的数据包积累到一定大小才发送;
语法:tcp_nopush
on|off;tcp_nodelay模块: 开启或关闭nginx使用
TCP_NODELAY选项的功能。这个选项仅在将连接转变为长连接的时候才被启用。TCP_NODELAY是禁用Nagle算法,即数据包立即发送出去。由于Nagle和DelayedACK的原因,数据包的确认信息需要积攒到两个时才发送,长连接情况下,奇数包会造成延时40ms,所以tcp_nodelay会将ack(确认包)立刻发出去。如果不在长连接时,可以关闭此模块,因为ack会被立刻发出去。语法:tcp_nodelay on | off; (默认是开启的)
9.5、文件压缩模块
启动该模块,使文件传输前进行压缩,提升传输效率;
- 模块名称 :
ngx_http_gzip_module
# Directives
# 启用或禁用
Syntax:	gzip on | off;
Default:	gzip off;
Context:	http, server, location, if in location

# 压缩级别,级别越高压缩时间越长,体积压的也小
Syntax:	gzip_comp_level level;
Default:	gzip_comp_level 1;(1~9)
Context:	http, server,location

# gzip version
Syntax:	gzip_http_version 1.0 | 1.1;
Default:	gzip_http_version 1.1;
Context:	http, , server,location

# gzip type
Syntax:	gzip_types mime-type ...;
Default:	gzip_types text/html;
Context:	http,server,location

# 静态压缩
Syntax:	gzip_static on | off | always;
Default:	gzip_static off;
Context:	http, server, location
# 静态压缩官网示例
gzip_static  on;
gzip_proxied expired no-cache no-store private auth;
9.6、页面缓存模块
expires起到控制页面缓存的作用,合理的配置expires可以减少很多服务器的请求要配置expires,可以在http段中或者server段中或者location段中加入。
Nginx(expires 缓存减轻服务端压力);
模块名:
ngx_http_headers_module语法:
expires [modified] time;expires epoch | max | off;
Syntax:	expires [modified] time;  # 缓存时间
	    expires epoch | max | off;
Default:	expires off; # 默认关闭
Context:	http, server, location, if in location

# 并不是所有的网页都适合开启缓存,比如12306,前一秒看票还有,后一秒就无了

vim /etc/nginx/conf.d/default.conf
location{
    expires 24h; # 缓存24h
}
9.7、防盗链模块
该模块用于阻止对"引用者"标头字段中具有无效值的请求访问站点。应该记住,使用适当的"Referer"字段值制造请求非常容易,因此此模块的预期目的不是彻底阻止此类请求,而是阻止常规浏览器发送的大量请求流。还应该考虑到,即使对于有效的请求,常规浏览器也可能不会发送"引用者"字段。ngx_http_referer_module;
比如,我不想让你盗用我服务器的图片,那么就可以通过添加防盗链来限制你使用URL来盗用我的图片;当然也可以通过server_name添加白名单来允许一部分网站来使用;
- 模块名:
ngx_http_referer_module
# 语法
Syntax:	valid_referers none | blocked | server_names | string ...;
Default:	—
Context:	server, location
# 官网示例
valid_referers none blocked server_names
               *.example.com example.* www.example.org/galleries/
               ~\.google\.;

if ($invalid_referer) {
    return 403;
}
9.7.1、日志格式字段
- 字段名:
$http_referer
日志格式中的http_referer是记录,访问点引用的URL。也就是超链接的上一级地址。通过这段地址,可以发现一种网络行为——盗链。非法盗链会影响站点的正常访问。通过http_referer模块可以控制这一点。防止非法盗链现象。
9.8、访问限制模块
9.8.1、ngx_http_limit_req_module模块
用于限制每个已定义键的请求处理速率,特别是来自单个 IP 地址的请求的处理速率,使用"leaky bucket"方法完成限制;
- 模块名:
ngx_http_limit_req_module
# 语法
Syntax:	limit_req zone=name [burst=number] [nodelay | delay=number];
Default:	—
Context:	http, server,location
官网示例
#         Example Configuration
http {
    limit_req_zone $binary_remote_addr zone=one:10m rate=1r/s;

    ...

    server {

        ...

        location /search/ {
            limit_req zone=one burst=5;
        }

# 定义剖析
 limit_req_zone $binary_remote_addr zone=one:10m rate=1r/s;
# 剖析
 limit_req_zone :限制请求
 $binary_remote_addr :二进制地址
 zone=one:10m :限制策略的名称:占用10M空间
 rate=1r/s:允许每秒1次请求

 # 引用剖析
 limit_req zone=one burst=5;
 # 剖析
limit_req zone=one:引用限制策略的名称one

burst=5 表示最大延迟请求数量不大于5。如果太过多的请求被限制延迟是不需要的,这时需要使用nodelay参数,服务器会立刻返回503状态码。
个人示例
1、控制Nginx连接数

	1、安装ab测试命令
	yum install httpd-tools -y

	2、ab 参数
		-n : 总共需要访问多少次
		-c : 每次访问多少个

[root@web01 conf.d]# vim game5.conf
# limit_req_zone $remote_addr zone=one:10m rate=1r/s;
limit_conn_zone $remote_addr zone=addr:10m;
server {
    listen 80;
    server_name 192.168.15.7;
    # limit_req zone=one burst=5;
    limit_conn addr 1;
    location / {
        root /opt/Super_Marie;
	index index.html;
    }
}
9.8.2、ngx_http_limit_conn_module模块
- 模块名:
ngx_http_limit_conn_module
ngx_http_limit_conn_module模块用于限制链接(TCP),特别是来自单个IP地址的连接数。不是所有的连接都被计算在内。只有当服务器正在处理一个请求,并且整个请求头已经被读取时,连接才会被计数。
# 语法
Syntax:	limit_conn zone number;
Default:	—
Context:	http, server, location
# 官网示例
http {
limit_conn_zone $binary_remote_addr zone=addr:10m;
...
server {
...
location /download/ {
limit_conn addr 1;
}# 个人示例
[root@web01 conf.d]# vim game5.conf
# limit_req_zone $remote_addr zone=one:10m rate=1r/s;
limit_conn_zone $remote_addr zone=addr:10m;
server {
listen 80;
server_name 192.168.15.7;
# limit_req zone=one burst=5;
limit_conn addr 1;
location / {
root /opt/Super_Marie;
index index.html;
}
}9.9、访问控制模块
9.9.1、控制ip访问
- 模块名:
ngx_http_access_module
基于ip操作
Syntax:	allow address | CIDR | unix: | all;
Default:	—
Context:	http, server, location, limit_except

Syntax:	deny address | CIDR | unix: | all;
Default:	—
Context:	http, server, location, limit_except

# allow:    允许
# deny :    拒绝
通过deny和allow,拒绝或者允许某些ip访问
# 官网示例
location / {
deny 192.168.1.1; # 拒绝
allow 192.168.1.0/24; # 允许
allow 10.1.1.0/16;
allow 2001:0db8::/32;
deny all; # 拒绝所有
}# 示例1:
允许192.168.15.1访问,不允许其他IP访问
server {
listen 80;
server_name www.Super_Mario.com;
allow 192.168.15.1;
deny all;
location / {
root /opt/Super_Mario;
index index.html;
}
}
# 示例2:
允许192.168.15.0这个网段访问,不允许其他网段访问
allow 192.168.15.0/24;
deny all;
# 示例3:
只允许通过VPN来访问
allow 172.16.1.81;
deny all;9.9.2、控制用户访问
通过设置用户名密码来限制访问
- 模块名:
ngx_http_auth_basic_module
# 启用语法
Syntax:	auth_basic string | off;
Default:	auth_basic off;
Context:	http, server, location, limit_except

# 指定密码文件
Syntax:	auth_basic_user_file file;
Default:	—
Context:http,server,location,limit_except
# 官网示例
location / {
auth_basic "closed site";
auth_basic_user_file conf/htpasswd;
}# 示例:访问之前需要登录
# 安装httpd-tools
[root@web01 conf.d]# yum install httpd-tools -y
# 生成用户名密码文件
[root@web01 conf.d]# htpasswd -c /etc/nginx/auth hammer
New password:
Re-type new password:
Adding password for user hammer
# 查看
[root@web01 conf.d]# cat /etc/nginx/auth
hammer:$apr1$fOHr21Vf$zpI/MVxQ452KzP0p10QI10
# 将密码文件路径加入配置
server {
listen 80;
server_name www.Super_Mario.com;
auth_basic "hello nginx";
auth_basic_user_file /etc/nginx/auth;
location / {
root /opt/Super_Mario;
index index.html;
}
}
[root@web01 conf.d]# nginx -t
nginx: the configuration file /etc/nginx/nginx.conf syntax is ok
nginx: configuration file /etc/nginx/nginx.conf test is successful
[root@web01 conf.d]# systemctl restart nginx
9.10、目录索引模块
作用是实现网页结构目录索引
- 模块名:
ngx_http_autoindex_module
# 语法
Syntax:	autoindex on | off;
Default:
autoindex off;
Context:	http, server,location
# 官网示例
location / {
autoindex on;
}10、HTTP 协议
👉HTTP|MDN Web官网
HTTP(HyperText Transfer Protocol),超文本传输协议,是一种建立在TCP上的无状态连接,整个基本的工作流程是客户端发送一个HTTP请求,说明客户端想要访问的资源和请求的动作,服务端收到请求(request)之后,服务端开始处理请求,并根据请求做出相应的动作访问服务器资源,最后通过发送HTTP响应把结果返回给客户端,其中一个请求的开始到一个响应的结束称为事务,当一个事物结束后还会在服务端添加一条日志条目;
11、HTTPS
HTTPS总结在下博文👇
👉HTTPS
12、Nginx rewrite
重定向总结在下博文👇
👉Rewrite
13、Nginx平滑升级
- 不需要卸载重安装,在用户可以正常访问的情况下,服务器由低版本升级成高版本;
- 想平滑升级,必须是Nginx编译安装,编译安装可以同时安装多个版本。不能是yum安装
- 平滑升级是针对未编译模块添加和版本的更新
# 步骤:
1、编译安装要更新nginx版本,指定安装目录
[root@ze ~]# wget https://nginx.org/download/nginx-1.20.1.tar.gz
[root@ze ~]# tar -xf nginx-1.20.1.tar.gz
# 指定目录
[root@ze nginx-1.20.2]# ./configure --prefix=/opt/nginx1.20.1
[root@ze nginx-1.20.2]# make
[root@ze nginx-1.20.2]# make install
# 补充1:./configure可以指定目录用户模块等
 ./configure --prefix=/usr/local/app/nginx --user=nginx --group=nginx --with-http_sub_module --with-http_ssl_module --with-http_gzip_static_module --with-pcre=/usr/local/app/nginx/pcre-8.40 --with-zlib=/usr/local/app/nginx/zlib-1.2.11 --with-http_stub_status_module
# 补充2:如果使用编译安装nginx查看版本,不能直接使用nginx -v,因为没有环境变量,必须切换到/usr/local/nginx/sbin目录下,这个目录下的nginx是可执行的
[root@ze sbin]# /usr/local/nginx/sbin/nginx -v
nginx version: nginx/1.20.1
[root@ze sbin]# /usr/local/nginx/sbin/nginx -V
nginx version: nginx/1.20.1
built by gcc 4.8.5 20150623 (Red Hat 4.8.5-44) (GCC)
configure arguments:

2、做软连接:方便版本回退
[root@ze sbin]# ln -s /opt/nginx1.20.1 /usr/local/nginx
3、添加环境变量,就可以直接使用nginx参数(-v -V -t -c···)
PATH=$PATH:/usr/local/nginx/sbin/

# [root@ze sbin]# mv/usr/local/nginx/sbin/nginx /usr/sbin/nginx

3、查看旧的nginx主进程号和工作进程号
[root@ze ~]# ps aux|grep nginx
 root       1455  0.0  0.1  46504  1184 ?        Ss   11:36   0:00nginx: master process /usr/sbin/nginx -c /etc/nginx/nginx.conf
补:启动代码格式:nginx安装目录地址 -c nginx配置文件地址

4、工作完毕重启程序
[root@ze ~]# kill -USR2 1455 (进程号)


Nginx版本回退只需要将软连接删除,重新将指定的版本软连接即可
rm -rf /usr/local/nginx
ln -s /opt/nginx1.20.1 /usr/local/nginx
13.1、Nginx 平滑增加模块
我总结在下博文👇
👉Nginx 平滑增加模块
补:博文链接
👉 看完还不满足这边我总结了Nginx其他相关内容:Linux进阶归档
发现几篇相关的博文,这几位大佬写的是真不错,哈哈哈
👉I/O多路复用不理解可以去阅览一下此博文:IO多路复用机制详解
👉HTTP协议不懂的可以阅览:HTTP和HTTPS协议
👉Http、server、location三者配置关系:nginx配置

【如有错请指正,总结不易,推荐一下叭~】
版权说明 : 本文为转载文章, 版权归原作者所有 版权申明
原文链接 : https://www.cnblogs.com/48xz/p/15781821.html
内容来源于网络,如有侵权,请联系作者删除!
相关文章

热门标签
更多最新文章
更多- 浏览(4368) 发布于 2023-02-12
- 浏览(7986) 发布于 2023-02-12
- 浏览(3922) 发布于 2023-02-12
- 浏览(2875) 发布于 2023-02-12
- 浏览(883) 发布于 2023-02-12