Spring Boot微服务-Spring Cloud配置服务器
在本教程中,我们将学习如何创建Spring云配置服务器来集中Spring引导微服务的配置。
问题
在微服务项目中,可能有大量的微服务,并且这些微服务的多个实例正在运行。手动更新配置属性并重新启动所有这些实例,甚至使用自动脚本可能都不可行
解决方案
Spring Cloud Config解决了这个问题。
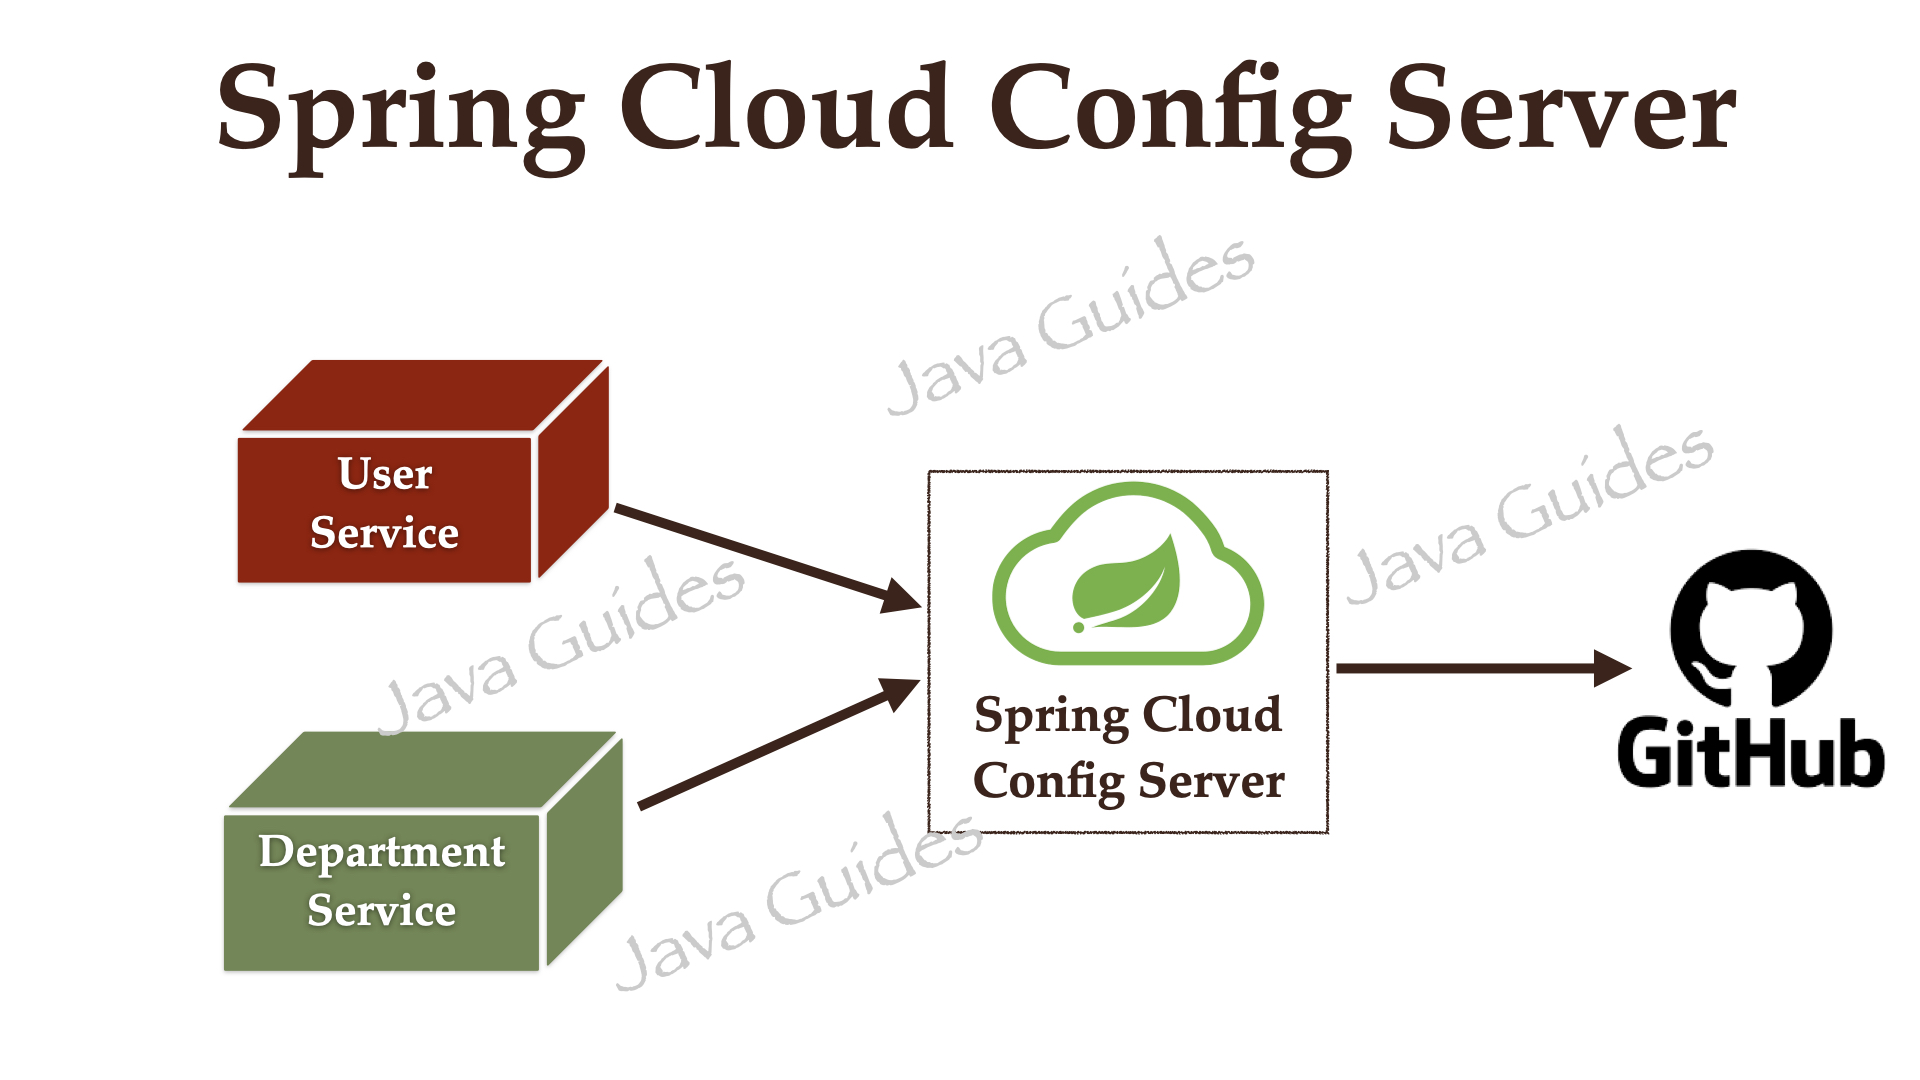
我们可以创建一个Spring云配置服务器,为我们所有的微服务提供配置值。我们可以使用git、svn、数据库或Consul作为后端来存储配置参数
接下来,我们可以在微服务中配置Spring Cloud Config服务器的位置,以便在启动应用程序时加载所有属性。除此之外,每当我们更新属性时,我们都可以在微服务中调用actuator/refresh REST端点,这样它将重新加载配置更改,而不需要我们重新启动应用程序。
我们将做什么?
让我们使用Git作为后端来创建Spring Cloud Config Server来存储配置。Spring Cloud Config Server只是一个SpringBoot项目。
1.在IntelliJ IDEA中创建和设置Spring Boot项目
让我们使用spring initializr创建一个Spring启动项目。
使用spring initializr创建弹簧引导应用程序时,请参阅以下屏幕截图以输入详细信息:

单击Generate按钮以zip文件的形式下载Spring引导项目。解压缩zip文件并在IntelliJIDEA中导入Spring引导项目。
以下是供您参考的pom.xml文件:
<?xml version="1.0" encoding="UTF-8"?>
<project xmlns="http://maven.apache.org/POM/4.0.0" xmlns:xsi="http://www.w3.org/2001/XMLSchema-instance"
	xsi:schemaLocation="http://maven.apache.org/POM/4.0.0 https://maven.apache.org/xsd/maven-4.0.0.xsd">
	<modelVersion>4.0.0</modelVersion>
	<parent>
		<groupId>org.springframework.boot</groupId>
		<artifactId>spring-boot-starter-parent</artifactId>
		<version>2.7.4</version>
		<relativePath/> <!-- lookup parent from repository -->
	</parent>
	<groupId>net.javaguides</groupId>
	<artifactId>config-server</artifactId>
	<version>0.0.1-SNAPSHOT</version>
	<name>config-server</name>
	<description>Demo project for Spring Boot</description>
	<properties>
		<java.version>17</java.version>
		<spring-cloud.version>2021.0.4</spring-cloud.version>
	</properties>
	<dependencies>
		<dependency>
			<groupId>org.springframework.boot</groupId>
			<artifactId>spring-boot-starter-actuator</artifactId>
		</dependency>
		<dependency>
			<groupId>org.springframework.cloud</groupId>
			<artifactId>spring-cloud-config-server</artifactId>
		</dependency>

		<dependency>
			<groupId>org.springframework.boot</groupId>
			<artifactId>spring-boot-starter-test</artifactId>
			<scope>test</scope>
		</dependency>
	</dependencies>
	<dependencyManagement>
		<dependencies>
			<dependency>
				<groupId>org.springframework.cloud</groupId>
				<artifactId>spring-cloud-dependencies</artifactId>
				<version>${spring-cloud.version}</version>
				<type>pom</type>
				<scope>import</scope>
			</dependency>
		</dependencies>
	</dependencyManagement>

	<build>
		<plugins>
			<plugin>
				<groupId>org.springframework.boot</groupId>
				<artifactId>spring-boot-maven-plugin</artifactId>
			</plugin>
		</plugins>
	</build>

</project>
2.使用@EnableConfigServer注解启用配置服务器
为了使我们的Spring Boot应用程序成为Spring Cloud Config Server,我们只需要将@EnableConfigServer注解添加到主入口点类:
package net.javaguides.configserver;

import org.springframework.beans.factory.annotation.Value;
import org.springframework.boot.SpringApplication;
import org.springframework.boot.autoconfigure.SpringBootApplication;
import org.springframework.cloud.config.server.EnableConfigServer;
import org.springframework.web.bind.annotation.GetMapping;

@EnableConfigServer
@SpringBootApplication
public class ConfigServerApplication {

	public static void main(String[] args) {
		SpringApplication.run(ConfigServerApplication.class, args);
	}

}
3.配置Git存储库的位置
在Github上,创建一个名为“microservices-config-repo”的Git存储库。
现在,让我们配置git存储库的位置,将所有配置文件存储在application.properties文件中。
spring.application.name=config-server
server.port=8888

spring.cloud.config.server.git.uri=https://github.com/RameshMF/microservices-config-repo.git
spring.cloud.config.server.git.skipSslValidation=true
spring.cloud.config.server.git.clone-on-start=true
management.endpoints.web.exposure.include=*
这就是创建Spring Cloud Config Server所需的全部内容,只需在git存储库中添加特定于应用程序的配置文件。
您可以参考我的GitHub存储库:https://github.com/RameshMF/microservices-config-repo
4.重构部门服务以使用Config Server
我们的department-service将成为Config Server的客户端。因此,让我们将Config Client starter依赖项添加到department-service:
在department-service中,将以下依赖项添加到pom.xml:
<dependency>
			<groupId>org.springframework.cloud</groupId>
			<artifactId>spring-cloud-starter-config</artifactId>
		</dependency>

		<dependency>
			<groupId>org.springframework.boot</groupId>
			<artifactId>spring-boot-starter-actuator</artifactId>
		</dependency>
5.将department-service.properties文件推送到GitHub
现在,我们需要在department-service.properties中添加department-service的所有属性,并将其提交/推送到git repo微服务config repo。
在GitHub存储库中创建新文件e1d8d1,添加以下内容并提交:
spring.datasource.url=jdbc:mysql://localhost:3306/department_db
spring.datasource.username=root
spring.datasource.password=Mysql@123

spring.jpa.properties.hibernate.dialect=org.hibernate.dialect.MySQLDialect
spring.jpa.hibernate.ddl-auto=update
6.在部门服务中配置配置服务器
接下来,使用配置服务器更改resources/application.properties
spring.application.name=department-service
spring.config.import=optional:configserver:http://localhost:8888
management.endpoints.web.exposure.include=*
接下来,启动Config Server应用程序,然后启动部门服务应用程序。这应该很好。您可以检查控制台日志,说明部门服务正在启动时从配置服务器http://localhost:8888/获取属性。
7.重构用户服务以使用Config Server
我们的user-service将成为Config Server的客户端。因此,让我们将Config Client starter添加到user-service,这将添加以下依赖项。
在用户服务中,将以下依赖项添加到pom.xml:
<dependency>
			<groupId>org.springframework.cloud</groupId>
			<artifactId>spring-cloud-starter-config</artifactId>
		</dependency>

		<dependency>
			<groupId>org.springframework.boot</groupId>
			<artifactId>spring-boot-starter-actuator</artifactId>
		</dependency>
8.将user-service.properties文件推送到GitHub
现在,我们需要在user-service.properties中添加user-service的所有属性,并将其提交/推送到git repo微服务config repo。
在GitHub存储库中创建新文件e1d14d1,添加以下内容并提交:
spring.datasource.url=jdbc:mysql://localhost:3306/employee_db
spring.datasource.username=root
spring.datasource.password=Mysql@123

spring.jpa.properties.hibernate.dialect=org.hibernate.dialect.MySQLDialect
spring.jpa.hibernate.ddl-auto=update

server.port = 8081
9.在用户服务中配置配置服务器
接下来,使用配置服务器更改resources/application.properties
spring.application.name=USER-SERVICE
spring.config.import=optional:configserver:http://localhost:8888
management.endpoints.web.exposure.include=*
现在,首先启动Config Server应用程序,然后启动user-service应用程序。这应该很好。您可以检查控制台日志,确认user-service在启动时正在从配置服务器http://localhost:8888/获取属性。
10.刷新用例
我们还希望启用/refresh端点,以演示动态配置更改。
客户端可以使用传统机制(例如@ConfigurationProperties或@value(“${…}“)或通过环境抽象)。现在您需要创建一个Spring MVC REST控制器来返回已解决的混乱
在部门服务中,创建以下REST API:
package net.javaguides.departmentservice.controller;

import org.springframework.beans.factory.annotation.Value;
import org.springframework.cloud.context.config.annotation.RefreshScope;
import org.springframework.web.bind.annotation.GetMapping;
import org.springframework.web.bind.annotation.RestController;

@RefreshScope
@RestController
class MessageRestController {

    @Value("${message:Hello default}")
    private String message;

    @GetMapping("/message")
    String getMessage() {
        return this.message;
    }
}
默认情况下,配置值在客户端启动时读取,而不是再次读取。您可以使用Spring Cloud Config @RefreshScope注解MessageRestController,然后触发刷新事件,从而强制bean刷新其配置(即从Config Server中提取更新的值)
测试刷新用例
您可以通过首先启动配置服务,然后在其运行后启动客户端来测试端到端结果。在浏览器中访问客户端应用程序http://localhost:8080/message。在这里,您应该可以在响应中看到Hello world。
将Git存储库中department-service.properties文件中的消息键更改为其他内容(Hello,Ramesh!)。
您需要调用/refresh Spring Boot Actuator端点,以强制客户端刷新自身并提取新值。SpringBoot的Actuator公开了关于应用程序的操作端点(例如健康检查和环境信息)。
您可以通过向客户机的刷新端点发送一个空的HTTP POST来调用refresh Actuator端点:http://localhost:8080/actuator/refresh。然后,您可以通过访问http://localhost:8080/message端点来确认它有效。
11.测试部门服务和用户服务
首先,启动配置服务器,然后启动部门服务和用户服务。
如果您的department-service能够连接到MySQL数据库,那么您已经成功配置了配置服务器。
如果您的user-service能够连接到MySQL数据库,那么您已经成功配置了配置服务器。
接下来,您可以测试department-service和user-service微服务的REST端点。
请参阅Spring Boot Microservices Communication Example using RestTemplate以测试REST端点。
结论
在本教程中,我们学习了如何创建一个以Git为后端的Spring Cloud配置服务器,以集中Spring引导微服务的配置。
版权说明 : 本文为转载文章, 版权归原作者所有 版权申明
原文链接 : https://www.javaguides.net/2022/10/spring-boot-microservices-spring-cloud-config-server.html
内容来源于网络,如有侵权,请联系作者删除!
