ElasticSearch保护集群
插件:elasticsearch-http-basic
ElasticSearch集群安装完成后,默认不提供任何安全防护,为了集群的数据安装,需要对集群配置安全认证。
数据安全的基本要求
- 身份认证:鉴定用户身份是否合法
- 用户鉴权:设置哪个用户可以访问哪些索引,具有哪些权限
- 传输加密
- 日志审计:所有的操作记录需要有审计
对于安全方面,ElasticStack官方提供了 x-pack 组件,用于集群间的安全认证,不过这个组件的一些高级功能是收费的,只开放了一部分基本安全认证免费使用。
一些免费的解决方案:
- 社区中有些免费的 Security 插件
- Search Guard
- Readonly REST
- 设置nginx反向代理
- 通过nginx的 auth_basic 模块做一些基本的认证
- X-Pack 的 Basic 版
- 从 ES 6.8 & ES 7.0 开始,Security 纳入 x-pack 的Basic版本中,免费使用一些基本的功能
X-Pack 中的认证服务称为 Realms, Realms 有两种类型
- 内置 Realms(免费):File/Native 用户名密码保存在ElasticSearch
- 外置 Realms (收费):连接 LDAP / Active Directroy / PKI / SAML / Kerberos 进行统一认证
X-PACK 使用 RBAC的方式进行用户授权
RABC 是将一组的权限,定义为一个角色,然后将这个角色分配给某个用户,这个用户就具备了这些权限。
分配的这些权限,包括 索引级 字段级 集群级

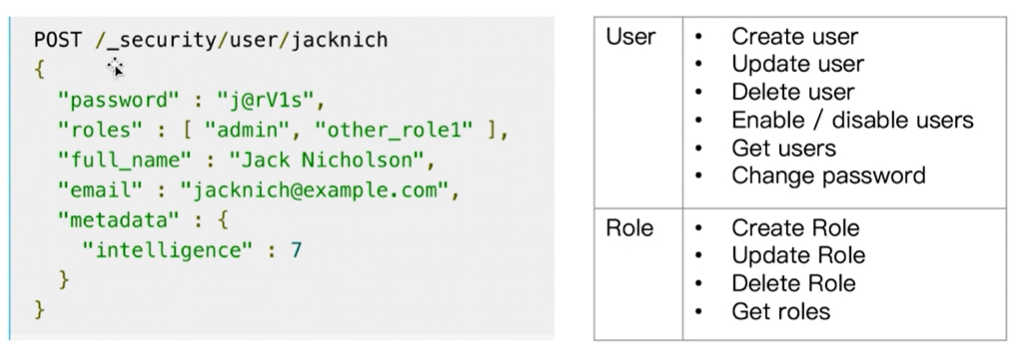
X-PACK 中内置了一些用户和角色

当打开Security 功能后,可以通过Security api 进行创建用户 和 角色
开启X-PACK 的认证与鉴权
需要在配置文件中开启x-pack验证, 修改elasticsearch.yml文件:
xpack.security.enabled: true
xpack.security.transport.ssl.enabled: true
重启服务:
systemctl restart elasticsearch.service
执行设置用户名和密码的命令:
涉及用户:elastic、kibana、logstash_system、apm_system、beats_system、remote_monitoring_user
yum安装路径文件:
/usr/share/elasticsearch/bin/elasticsearch-setup-passwords
创建keystore文件
./bin/elasticsearch-keystore create
交互式设置密码
./bin/elasticsearch-setup-passwords interactive
执行过程:
# cd /usr/share/elasticsearch
# ./bin/elasticsearch-setup-passwords interactive
Initiating the setup of passwords for reserved users elastic,apm_system,kibana,logstash_system,beats_system,remote_monitoring_user.
You will be prompted to enter passwords as the process progresses.
Please confirm that you would like to continue [y/N]y


Enter password for [elastic]:
Reenter password for [elastic]:
Enter password for [apm_system]:
Reenter password for [apm_system]:
Enter password for [kibana]:
Reenter password for [kibana]:
Enter password for [logstash_system]:
Reenter password for [logstash_system]:
Enter password for [beats_system]:
Reenter password for [beats_system]:
Enter password for [remote_monitoring_user]:
Reenter password for [remote_monitoring_user]:
Changed password for user [apm_system]
Changed password for user [kibana]
Changed password for user [logstash_system]
Changed password for user [beats_system]
Changed password for user [remote_monitoring_user]
Changed password for user [elastic]
命令行测试:
# curl -u elastic:123456 -XGET "HTTP://127.0.0.1:9200"
{
  "name" : "localhost.localdomain",
  "cluster_name" : "elasticsearch",
  "cluster_uuid" : "Bo8zyK4XQJ6UTgM2ni9DVQ",
  "version" : {
    "number" : "7.6.2",
    "build_flavor" : "default",
    "build_type" : "rpm",
    "build_hash" : "ef48eb35cf30adf4db14086e8aabd07ef6fb113f",
    "build_date" : "2020-03-26T06:34:37.794943Z",
    "build_snapshot" : false,
    "lucene_version" : "8.4.0",
    "minimum_wire_compatibility_version" : "6.8.0",
    "minimum_index_compatibility_version" : "6.0.0-beta1"
  },
  "tagline" : "You Know, for Search"
}
修改密码命令如下
curl -H "Content-Type:application/json" -XPOST -u elastic 'http://127.0.0.1:9200/_xpack/security/user/elastic/_password' -d '{ "password" : "123456" }'
修改kibana配置文件
elasticsearch.username: "kibana"
elasticsearch.password: "123456"
集群认证
集群身份认证需要跟集群内部安全通信一起配置不然会报错
集群身份认证
在elasticsearch.yml配置文件中加入
xpack.security.enabled: true
集群内部安全通信
1.生成证书
为Elasticsearch集群创建一个证书颁发机构。
bin/elasticsearch-certutil ca
2.为集群中的每个节点生成证书和私钥
bin/elasticsearch-certutil cert --ca elastic-stack-ca.p12
可以在创建过程中加入密码
3.将证书拷贝到elasticsearch的每个节点下面config/certs目录下
[root@localhost elasticsearch]# mkdir -p /etc/elasticsearch/certs
[root@localhost elasticsearch]# cp elastic-certificates.p12 /etc/elasticsearch/certs
[root@localhost elasticsearch]# chown elasticsearch /etc/elasticsearch/certs/elastic-certificates.p12
4.配置elasticsearch.yml文件
xpack.security.transport.ssl.enabled: true
xpack.security.transport.ssl.verification_mode: certificate

xpack.security.transport.ssl.keystore.path: certs/elastic-certificates.p12
xpack.security.transport.ssl.truststore.path: certs/elastic-certificates.p12
5.如果在创建证书的过程中加了密码,需要将你的密码加入到你的Elasticsearch keystore中去。每个节点都需要
bin/elasticsearch-keystore add xpack.security.transport.ssl.keystore.secure_password

bin/elasticsearch-keystore add xpack.security.transport.ssl.truststore.secure_password
给认证的集群创建用户密码
bin/elasticsearch-setup-passwords interactive
通过第三步,可以给ES中许多内置的用户创建密码
- elastic 账号:拥有 superuser 角色,是内置的超级用户。
- kibana 账号:拥有 kibana_system 角色,用户 kibana 用来连接 elasticsearch 并与之通信。Kibana 服务器以该用户身份提交请求以访问集群监视 API 和 .kibana 索引。不能访问 index。
- logstash_system 账号:拥有 logstash_system 角色。用户 Logstash 在 Elasticsearch 中存储监控信息时使用。
- beats_system账号:拥有 beats_system 角色。用户 Beats 在 Elasticsearch 中存储监控信息时使用。
elastic是超级用户,它可以做任何事情
在Kibana中设置登录ES的用户
我们可以首先给Kibana配置上超级用户elastic,这样可以使用Kibana给ES集群配置不同的用户与角色。
- 角色:我们可以给ES中的角色,赋予对不同索引的不同的读写权限。
- 用户:我们可以将不同角色,赋予用户。
有两种方式使kibana访问ES集群。
- 在Kibana.yml中配置
elasticsearch.username: "xxx"
elasticsearch.password: "xxx"
- 使用Kibana.keystore
bin/kibana-keystore create
bin/kibana-keystore add elasticsearch.name
bin/kibana-keystore add elasticsearch.password
#删除
bin/kibana-keystore remove xxxx
登录Kibana设置角色跟用户
内容来源于网络,如有侵权,请联系作者删除!
