POI 合并单元格
1. 合并单元格概述
合并单元格CellRangeAddress就是将几个相邻的单元格合并为一个单元格,即使没有创建过行和单元格,也 可以创建合并单元格,因为单元格信息是单独存储的
/** * Creates new cell range. base 0 * * @param firstRow Index of first row * @param lastRow Index of last row (inclusive), must be equal to or larger than {@code firstRow} * @param firstCol Index of first column * @param lastCol Index of last column (inclusive), must be equal to or larger than {@code firstCol} */
    public CellRangeAddress(int firstRow, int lastRow, int firstCol, int lastCol)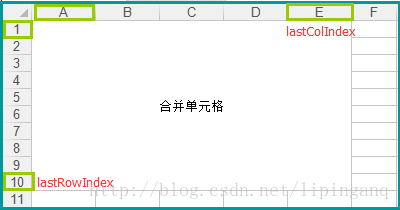
2. 创建合并单元格
创建合并单元格很简单:
1. 创建一个合并单元格region
 2. 将region添加到工作表Sheet中
CellRangeAddress region = new CellRangeAddress(firstRow, lastRow, firstCol, lastCol);
CellRangeAddress region = new CellRangeAddress("A1:E10");
sheet.addMergedRegion(region)3. 合并单元格内容
合并单元格的内容需要通过设置合并区域左上角单元格的内容确定,设置合并区域内其他单元格是不起效的
上图中需要设置A1单元格内容才是设置合并的那远哥的内容
Cell cell = sheet.createRow(0).createCell(0);
cell.setCellValue("合并单元格");
4. 实例
package hssf.sheet.cell;
import java.io.BufferedOutputStream;
import java.io.File;
import java.io.FileOutputStream;
import org.apache.poi.hssf.usermodel.HSSFWorkbook;
import org.apache.poi.hssf.usermodel.HSSFSheet;
import org.apache.poi.hssf.usermodel.HSSFCell;
import org.apache.poi.ss.usermodel.Cell;
import org.apache.poi.ss.usermodel.HorizontalAlignment;
import org.apache.poi.ss.usermodel.Sheet;
import org.apache.poi.ss.usermodel.VerticalAlignment;
import org.apache.poi.ss.usermodel.BorderStyle;
import org.apache.poi.ss.usermodel.IndexedColors;
import org.apache.poi.ss.usermodel.Workbook;
import org.apache.poi.ss.util.CellRangeAddress;
import org.apache.poi.ss.util.CellUtil;
import org.apache.poi.ss.util.RegionUtil;
import org.apache.poi.ss.util.WorkbookUtil;
/** * 合并单元格 * 1.创建一个合并单元格 * 2.设置合并单元格内容 * 3.设置合并单元格边框样式 * */
public class ExportRegionCell {
public static void main(String[] args) throws Exception {
File file = new File("C:\\Users\\Administrator\\Desktop\\test.xls");
if (file.exists()) {
file.delete();
}
BufferedOutputStream out = null;
try {
out = new BufferedOutputStream(new FileOutputStream("C:\\Users\\Administrator\\Desktop\\test.xls"));
exportExcel(out);
} finally {
out.close();
}
}
private static void exportExcel(BufferedOutputStream out) throws Exception {
Workbook workbook = new HSSFWorkbook();
// Workbook workbook = new XSSFWorkbook();
String safeSheetName = WorkbookUtil.createSafeSheetName("合并单元格");
Sheet sheet = workbook.createSheet(safeSheetName);
// 1.创建一个合并单元格
// CellRangeAddress region = new CellRangeAddress(0, 9, 0, 4);
CellRangeAddress region = CellRangeAddress.valueOf("A1:E10");
sheet.addMergedRegion(region);
// 2.设置合并单元格内容
Cell cell = sheet.createRow(0).createCell(0);
cell.setCellValue("合并单元格");
// 设置单元格内容水平垂直居中
CellUtil.setAlignment(cell, HorizontalAlignment.CENTER);
CellUtil.setVerticalAlignment(cell, VerticalAlignment.CENTER);
// 3.设置合并单元格边框
setBorderStyle(sheet, region);
workbook.write(out);
}
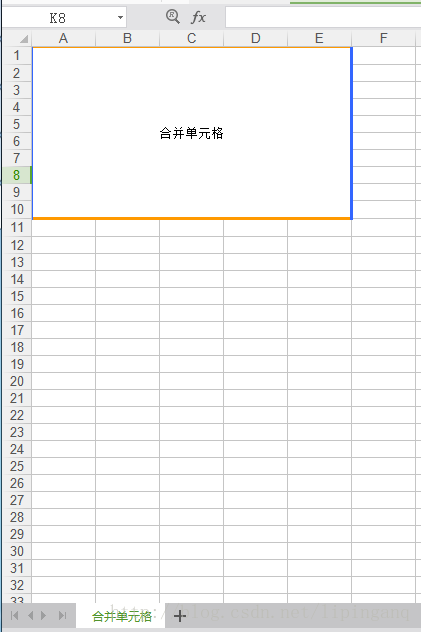
/** * 设置合并单元格边框 - 线条 * */
private static void setBorderStyle(Sheet sheet, CellRangeAddress region) {
// 合并单元格左边框样式
RegionUtil.setBorderLeft(BorderStyle.THICK, region, sheet);
RegionUtil.setLeftBorderColor(IndexedColors.LIGHT_BLUE.getIndex(), region, sheet);
// 合并单元格上边框样式
RegionUtil.setBorderTop(BorderStyle.THICK, region, sheet);
RegionUtil.setTopBorderColor(IndexedColors.LIGHT_ORANGE.getIndex(), region, sheet);
// 合并单元格右边框样式
RegionUtil.setBorderRight(BorderStyle.THICK, region, sheet);
RegionUtil.setRightBorderColor(IndexedColors.LIGHT_BLUE.getIndex(), region, sheet);
// 合并单元格下边框样式
RegionUtil.setBorderBottom(BorderStyle.THICK, region, sheet);
RegionUtil.setBottomBorderColor(IndexedColors.LIGHT_ORANGE.getIndex(), region, sheet);
}
}截图:
版权说明 : 本文为转载文章, 版权归原作者所有 版权申明
原文链接 : https://blog.csdn.net/lipinganq/article/details/78131694
内容来源于网络,如有侵权,请联系作者删除!