文章40 | 阅读 15159 | 点赞0
使用Spring的注解方式实现AOP入门
首先在Eclipse中新建一个普通的Java Project,名称为springAOP。为了使用Spring的注解方式进行面向切面编程,需要在springAOP项目中加入与AOP相关的jar包,spring aop需要额外的jar包有:
- com.springsource.org.aopalliance-1.0.0.jar
- com.springsource.org.aspectj.weaver-1.6.8.RELEASE.jar
- spring-aop-4.2.5.RELEASE.jar
- spring-aspects-4.2.5.RELEASE.jar
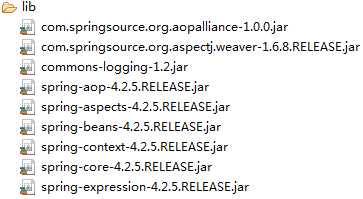
这样,springAOP项目共须jar包如下:
要进行AOP编程,我们接着要在Spring的配置文件——beans.xml中引入aop命名空间:
<?xml version="1.0" encoding="UTF-8"?>
<beans xmlns="http://www.springframework.org/schema/beans" xmlns:xsi="http://www.w3.org/2001/XMLSchema-instance" xmlns:context="http://www.springframework.org/schema/context" xmlns:aop="http://www.springframework.org/schema/aop" xsi:schemaLocation="http://www.springframework.org/schema/beans http://www.springframework.org/schema/beans/spring-beans.xsd http://www.springframework.org/schema/context http://www.springframework.org/schema/context/spring-context-4.2.xsd http://www.springframework.org/schema/aop http://www.springframework.org/schema/aop/spring-aop-4.2.xsd">

</beans>
Spring提供了两种切面声明方式,实际工作中我们可以选用其中一种:
- 基于XML配置方式声明切面。
- 基于注解方式声明切面。
本文选用第二种方式进行面向切面编程,即基于Spring注解的方式声明切面。
接下来我们在src目录下新建一个it.cast.service包,并在该包下创建PersonService接口,其代码为:
public interface PersonService {
    public void save(String name);
    public void update(String name, Integer id);
    public String getPersonName(Integer id);
}
紧接着在src目录下新建一个it.cast.service.impl包,并在该包下创建PersonService接口的实现类——PersonServiceBean.java,其代码为:
public class PersonServiceImpl implements PersonService {

    @Override
    public void save(String name) {
        System.out.println("我是save()方法");
    }

    @Override
    public void update(String name, Integer id) {
        System.out.println("我是update()方法");
    }

    @Override
    public String getPersonName(Integer id) {
        System.out.println("我是getPersonName()方法");
        return "xxx";
    }

}
然后,我们就要在cn.itcast.service包下创建一个切面类——MyInterceptor.java,下面我们来按照以下步骤将其写出来。
- 首先用@Aspect注解声明整个类是一个切面:
@Aspect
public class MyInterceptor {
    ...
}- 接着用@Pointcut注解声明一个切入点。
@Aspect
public class MyInterceptor {
    @Pointcut("execution (* cn.itcast.service.impl.PersonServiceImpl.*(..))")
    private void anyMethod() {} // 声明一个切入点,anyMethod为切入点名称
    ...
}
我们可利用方法签名来编写切入点表达式。最典型的切入点表达式是根据方法的签名来匹配各种方法:
execution (* cn.itcast.service.impl.PersonServiceImpl.*(..)):匹配PersonServiceImpl类中声明的所有方法。第一个*代表任意修饰符及任意返回值类型,第二个*代表任意方法,..匹配任意数量任意类型的参数,若目标类与该切面在同一个包中,可以省略包名。execution public * cn.itcast.service.impl.PersonServiceImpl.*(..):匹配PersonServiceImpl类中的所有公有方法。execution public double cn.itcast.service.impl.PersonServiceImpl.*(..):匹配PersonServiceImpl类中返回值类型为double类型的所有公有方法。execution public double cn.itcast.service.impl.PersonServiceImpl.*(double, ..):匹配PersonServiceImpl类中第一个参数为double类型,后面不管有无参数的所有公有方法,并且该方法的返回值类型为double类型。execution public double cn.itcast.service.impl.PersonServiceImpl.*(double, double):匹配PersonServiceImpl类中参数类型为double,double类型的,并且返回值类型也为double类型的所有公有方法。- 然后声明前置通知方法。
前置通知方法在目标方法开始之前执行。
@Aspect
public class MyInterceptor {
    @Pointcut("execution (* cn.itcast.service.impl.PersonServiceImpl.*(..))")
    private void anyMethod() {} // 声明一个切入点,anyMethod为切入点名称

    // 声明该方法是一个前置通知:在目标方法开始之前执行
    @Before("anyMethod()")
    public void doAccessCheck() {
        System.out.println("前置通知");
    }
}注意:若是将一个类声明为一个切面,那么需要把该类放到IOC容器管理。
接下来,我们理应要修改Spring的配置文件——beans.xml了,将其改为:
<?xml version="1.0" encoding="UTF-8"?>
<beans xmlns="http://www.springframework.org/schema/beans" xmlns:xsi="http://www.w3.org/2001/XMLSchema-instance" xmlns:context="http://www.springframework.org/schema/context" xmlns:aop="http://www.springframework.org/schema/aop" xsi:schemaLocation="http://www.springframework.org/schema/beans http://www.springframework.org/schema/beans/spring-beans.xsd http://www.springframework.org/schema/context http://www.springframework.org/schema/context/spring-context-4.2.xsd http://www.springframework.org/schema/aop http://www.springframework.org/schema/aop/spring-aop-4.2.xsd">

    <aop:aspectj-autoproxy />
    <bean id="myInterceptor" class="cn.itcast.service.MyInterceptor" />
    <bean id="personService" class=" cn.itcast.service.impl.PersonServiceImpl"></bean>
</beans>
从上面可看出我们并没有让Spring自动扫描和管理Bean。
最后,在src目录下新建一个junit.test包,并在该包中新建一个单元测试类——SpringAOPTest.java,其代码为:
public class SpringAOPTest {

    @Test
    public void interceptorTest() {
        ApplicationContext cxt = new ClassPathXmlApplicationContext("beans.xml");
        PersonService personService = (PersonService) cxt.getBean("personService");
        personService.save("xxx");
    }

}
测试interceptorTest()方法,会发现Eclipse控制台打印:

如要查看源码,可点击**使用Spring的注解方式实现AOP入门**进行下载。
版权说明 : 本文为转载文章, 版权归原作者所有 版权申明
原文链接 : https://liayun.blog.csdn.net/article/details/52865330
内容来源于网络,如有侵权,请联系作者删除!