文章26 | 阅读 9193 | 点赞0
swift详解之二十七------------自定义UINavigationController的push和pop动画
自定义UINavigationController的push和pop动画
我们这里先创建一个简单的工程 , 在storyboard 中拖一个导航控制器 , rootViewController 改成我们的ViewController 。
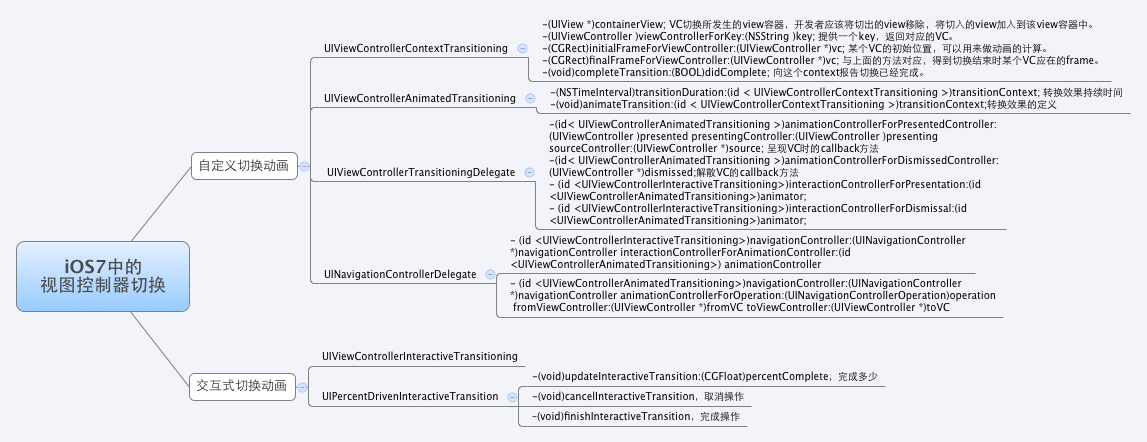
为了实现自定义动画切换 , 我们需要实现两个协议 。 UIViewControllerAnimatedTransitioning,UINavigationControllerDelegate
UIViewControllerAnimatedTransitioning 这个协议目的是在需要使用自定义动画的同时,又不影响视图的其他属性,让你把焦点集中在动画实现的本身上,然后通过在这个协议的回调里编写自定义的动画代码,负责切换的具体内容,任何实现了这一协议的对象被称之为动画控制器。
其中有两个比较重要的方法:
transitionDuration(transitionContext: UIViewControllerContextTransitioning?) -> NSTimeInterval

animateTransition(transitionContext: UIViewControllerContextTransitioning)
第一个返回一个动画持续时间就行了 , 第二个是动画主体 。transitionContext 在这里是一个核心 ,通过这个对象能获取到切换时的上下文信息,比如从哪个VC切换到哪个VC等。
let toViewController = transitionContext.viewControllerForKey(UITransitionContextToViewControllerKey);
        //let fromViewController = transitionContext.viewControllerForKey(UITransitionContextFromViewControllerKey);
        let container = transitionContext.containerView()
        container!.addSubview((toViewController?.view)!);

       if oper == UINavigationControllerOperation.Push {

            toViewController?.view.layer.anchorPoint = CGPointMake(0, 0)
            toViewController?.view.center = CGPointMake(0, 0)
            toViewController?.view.transform = CGAffineTransformMakeRotation(CGFloat(-M_PI_2))

        UIView.animateWithDuration(self.transitionDuration(transitionContext), delay: 0, usingSpringWithDamping: 0.5, initialSpringVelocity: 0.7, options: UIViewAnimationOptions.AllowUserInteraction, animations: { () -> Void in

            toViewController?.view.transform = CGAffineTransformMakeRotation(0)
            }, completion: { (b) -> Void in
                toViewController?.view.transform = CGAffineTransformIdentity
                //动画完成
                //没有取消就执行完成 取消了 就不能完成
                transitionContext.completeTransition(!transitionContext.transitionWasCancelled())
        })

        }else if oper == UINavigationControllerOperation.Pop{

            toViewController?.view.layer.anchorPoint = CGPointMake(1,0)  //0-1之间 不要犯傻。。
            toViewController?.view.center = CGPointMake(toViewController!.view.bounds.width, 0)
            toViewController?.view.transform = CGAffineTransformMakeRotation(CGFloat(-M_PI_2*3))

            UIView.animateKeyframesWithDuration(1.3, delay: 0, options: UIViewKeyframeAnimationOptions.AllowUserInteraction, animations: { () -> Void in

                UIView.addKeyframeWithRelativeStartTime(0.0, relativeDuration: 0.4, animations: { () -> Void in
                    toViewController?.view.transform = CGAffineTransformMakeRotation(CGFloat(-M_PI_2)*4)
                })

                UIView.addKeyframeWithRelativeStartTime(0.4, relativeDuration: 0.2, animations: { () -> Void in
                    toViewController?.view.transform = CGAffineTransformMakeRotation(CGFloat(M_PI_2/10))
                })
                UIView.addKeyframeWithRelativeStartTime(0.6, relativeDuration: 0.3, animations: { () -> Void in
                    toViewController?.view.transform = CGAffineTransformMakeRotation(CGFloat(-M_PI_2)*4)
                })

                }, completion: { (b) -> Void in
                    toViewController?.view.transform = CGAffineTransformIdentity
                    print(transitionContext.transitionWasCancelled())
                    //动画完成
                    //没有取消就执行完成 取消了 就不能完成
                    transitionContext.completeTransition(!transitionContext.transitionWasCancelled())
            })

        }
这里是我写的一段代码, 当然我这里分了pop 和 push, oper 变量是从另一个方法中获得的,下面会说 。to 和 from没啥说的 ,container这是一个特殊的容器,切换时的动画将在这个容器中进行。其他的就是push和pop 我自己做得一个动画主体 。当然你可以根据你的需求更改这些部分 。这里主要讲自定义 , 不讲动画。
我们还需要实现另一个协议UINavigationControllerDelegate ,这个协议用来配置一些导航控制器的交互方式等。
在我们的类中定义 var navgationController:UINavigationController
初始化的时候
init(nav:UINavigationController){
        self.navgationController = nav
        super.init()
        self.navgationController.delegate = self
    }
func navigationController(navigationController: UINavigationController, animationControllerForOperation operation: UINavigationControllerOperation, fromViewController fromVC: UIViewController, toViewController toVC: UIViewController) -> UIViewControllerAnimatedTransitioning? {
oper = operation
return self
}我们上面的oper 就是从这里来的, 这个可以得到当前进行的是push 还是 pop 。return nil 就表示用系统默认的动画 ,return self 就表示使用我们自己定的 ,如果你只定义了一个push 或者 pop ,可以加个判断 。
这时候的效果应该是这样的:
gif有点卡顿 ,应该都有弹的效果的。。。后面会附上源码 ,大家自己运行看看
如果还要支持手势先加上这个方法
func navigationController(navigationController: UINavigationController, interactionControllerForAnimationController animationController: UIViewControllerAnimatedTransitioning) -> UIViewControllerInteractiveTransitioning? {
        /**
        *  监控进度
        */
        if animationController.isKindOfClass(MyAnimation.self)
        {
            return self._interactivePushTransition
        }
        return nil;
    }
然后写两个手势操作 ,分别针对 push和pop
func handleControllerPush(sender:UIPanGestureRecognizer){

        let location = sender.translationInView(sender.view)
        var progress = location.x / (sender.view?.bounds.size.width)!
       // print("\(location.x),\((sender.view?.bounds.size.width)!)")

        progress = max(-1, min(progress, 0));
        let pz = progress * -1
        //print(progress)
        if sender.state == UIGestureRecognizerState.Began{
            /**
            *  手势开始,新建一个监控对象
            */
            self._interactivePushTransition = UIPercentDrivenInteractiveTransition()
            /**
            *  告诉控制器开始执行push的动画
            */
            self.navgationController.pushViewController(toVc!, animated: true)

        }else if sender.state == UIGestureRecognizerState.Changed{
            /**
            *  更新手势的完成进度
            */
            //print(progress * -1)
            _interactivePushTransition?.updateInteractiveTransition(pz)

        }else if(sender.state == UIGestureRecognizerState.Ended || sender.state == UIGestureRecognizerState.Changed){
            /**
            *  手势结束时如果进度大于一半,那么就完成push操作,否则重新来过。
            */
            print(pz)
            if(pz > 0.14 ){
                self._interactivePushTransition?.finishInteractiveTransition()
            }else{
                self._interactivePushTransition?.cancelInteractiveTransition()
            }
            //当切换动画完毕时,设定interactionController为nil非常重要。如果下一个动画是非交互的,我们不希望得到一个奇怪的 interactionController
            self._interactivePushTransition = nil
        }
    }
pop的就不放了 , 自己下载代码看吧 。。
写一个自己的导航控制器 。
protocol MyPushNav{

    func pushView()->UIViewController;

}
class MyNavigationController: UINavigationController {

    var pushDele:MyPushNav?
    var animate:MyAnimation?
    override func viewDidLoad() {

        super.viewDidLoad()
        animate = MyAnimation(nav: self);
        let pan = UIPanGestureRecognizer(target: animate, action: "handleControllerPop:")
        self.view.addGestureRecognizer(pan)
    }

    override func viewDidAppear(animated: Bool) {
         pushView();
    }

    func pushView(){
        let pan2 = UIPanGestureRecognizer(target: animate, action: "handleControllerPush:")
        if let _ = pushDele {
            let sc = pushDele?.pushView()
            self.animate?.toVc = sc
            (pushDele as! UIViewController).view.addGestureRecognizer(pan2)
        }else{
            self.view.removeGestureRecognizer(pan2)
        }
    }

}
需要push的必须告知我们用push哪个,所以这些用了协议 。
pop的不用做任何操作 。
class ViewController: UIViewController,MyPushNav {

       override func viewDidLoad() {
        super.viewDidLoad()

        (self.navigationController as! MyNavigationController).pushDele = self

        // Do any additional setup after loading the view, typically from a nib.
    }

    override func didReceiveMemoryWarning() {
        super.didReceiveMemoryWarning()
        // Dispose of any resources that can be recreated.
    }

    func pushView()->UIViewController {
        return SecondViewController()
    }

}
这个是push的 。。
附上一张有用的图理解理解
源码地址 :MyNavigationController
学习iOS,有他就够了,小码哥视频,传智、黑马、各种swift书籍
版权说明 : 本文为转载文章, 版权归原作者所有 版权申明
原文链接 : https://blog.csdn.net/u010586842/article/details/48368239
内容来源于网络,如有侵权,请联系作者删除!